Removing and checking the thermostat
When checking the thermostat on a car after starting a cold engine, the lower hose leading from the radiator should remain cold for some time
Then (after the coolant temperature reaches 85-92 °C) it quickly heats up, which indicates the start of coolant circulation in a large circle.
To dismantle the thermostat, drain the coolant.

To make it easier to unscrew the front upper screw securing the thermostat housing, use a Phillips screwdriver to loosen the clamp on the radiator outlet hose.

Slide the clamp along the hose.

Without removing the hoses from the thermostat housing pipes, use a 5mm hex to unscrew the three screws securing the thermostat housing.
Disconnect the housing from the outlet pipe.

Inserting pliers with narrow jaws into the holes of the fixing plate, and compressing the thermostat spring, turn (in any direction) the plate so that it comes out from behind the protrusions of the housing.
Remove the thermostat from the housing.

Remove the rubber O-ring from the groove of the exhaust pipe.
If the O-ring is damaged or not elastic, it must be replaced with a new one
To check the thermostat, lower it into a container with coolant.
Heat the vessel, simultaneously stirring the liquid and monitoring the beginning of the opening of the main valve with a thermometer.
The valve stem should begin to extend at a temperature of (85±2) °C and fully extend (a stroke of at least 8 mm) at a temperature of (100±2) °C.
Install the thermostat in reverse order.
Replacing the expansion tank
If there is coolant in the expansion tank, place a wide container under the car, in the area where the tank is located.

Using a Phillips screwdriver, loosen the clamp securing the inlet hose and remove the hose from the tank nozzle (for clarity, the battery has been removed).

Using a Phillips screwdriver, loosen the clamp securing the steam exhaust hose and remove the hose from the tank nozzle

Using a 10mm socket, unscrew nut 1 and two bolts 2 securing the tank

Remove the tank.
Install the expansion tank in reverse order.
Removing and installing the electric radiator fan
Disconnect the terminal of the negative terminal wire of the battery.
Remove the air filter housing

Having released the block retainer, disconnect the block of the engine management system wiring harness from the fan motor.

Using a 10mm socket, unscrew the two nuts securing the electric fan casing to the radiator on the right side, and using a 8mm socket, unscrew the two bolts on the left side.

Mounts for attaching the electric fan casing to the radiator: 1 – bolts; 2 – nuts.

Remove the electric fan with casing assembly.

Using a screwdriver, remove the locking bracket from the groove of the electric motor shaft

Prying up the impeller with two screwdrivers

Press the impeller from the electric motor shaft

Using a 10mm socket, unscrew the three nuts securing the electric motor to the casing and separate them
Assemble and install the electric radiator fan of the cooling system in the reverse order.

When installing the impeller, the groove made in it must be aligned with the pin pressed into the hole in the motor shaft.
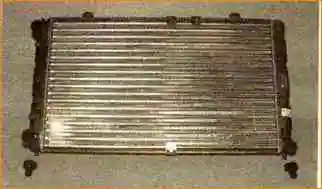
Replacing the radiator
On a cold engine, drain the coolant from the radiator.
Remove the electric fan.

Using a Phillips screwdriver, loosen the clamps securing the radiator outlet and inlet hoses.

Remove the inlet and outlet hoses from the radiator pipes.

Using a 10mm socket, unscrew the nut of the right-hand radiator mounting to the upper cross member of the radiator frame.
In the same way, unscrew the nut securing the left radiator to the upper cross member of the radiator frame (the nut is not visible in the photo).

We lift the radiator, removing the pins of its lower mounting from the rubber cushions, and move it to the left so that it comes out from behind the generator.

Tilting the radiator towards the engine, use a slotted screwdriver to loosen the ribbon clamp securing the steam exhaust hose

Remove the hose from the radiator fitting

Remove the radiator
Installing the radiator in reverse order
If the rubber cushions were removed along with the radiator, then when installing it, first insert the cushions into the holes in the lower cross member of the radiator frame.
Cushions that are torn or have lost their elasticity should be replaced with new ones.
We replace the tape clamp of the steam exhaust hose with a worm clamp.
Pour coolant into the cooling system and bring the fluid level in the tank to normal.
Replacing the coolant pump
Drain the coolant.
Remove the camshaft gear pulley (see “Replacing the camshaft oil seal”).
Remove the tension roller of the timing belt (see “Checking the condition and replacing the timing belt”).

Using a 10mm socket, unscrew the nut and bolt securing the rear timing drive cover.

Use a 5mm hex to unscrew the three screws securing the coolant pump, which simultaneously secure the back cover

Remove the rear timing cover

Having installed a slotted screwdriver under the tide on the pump body, press the pump away from the cylinder block.
Take out the coolant pump and remove the gasket.

Before installing the pump, we clean the adjacent surfaces of the pump and cylinder block from the remains of the old gasket.
Replace the pump gasket with a new one.
Install the coolant pump in reverse order.
Please note that the pump and gasket are installed in only one position - with the pump inspection hole down.
Apply sealant to both sides of the gasket before installation.
Replacing the coolant temperature gauge sensor
Drain some of the coolant from the engine cooling jacket.

Squeezing the clamps of the sensor wire block, disconnect the block from the sensor

Use a 21 key to unscrew the sensor
The sensor has a tapered thread, so its connection to the cylinder head does not require additional sealing.
We install the coolant temperature indicator sensor in the reverse order.