Maintenance of the heater is divided into the following types:
- - daily maintenance (DM);
- - maintenance after 100, 500 and 1000 hours of operation;
- - seasonal (before the start of the cold season).
Daily maintenance of the heater is performed only in the cold season.
Daily maintenance includes the following operations: checking the tightness of the fuel and cooling systems, spark plug connections with the bushing.
Fuel and coolant leaks are not allowed. If necessary, tighten the connections.
Maintenance after 100 hours of heater operation
All work provided by EO is carried out, and, if necessary (if there is no ignition), the operability of the spark plug and flame indicator must be checked.
To do this, clean the casing 1 (see Fig. 1) of the heater from dirt and dust, unfasten the latches 6, remove the casing 1, use an S=8 wrench to unscrew the nuts securing the wires, disconnect the power and ground wires from the spark plug and unscrew the spark plug with an S=19 wrench.
Clean the spark plug and spark plug bushing from soot using a screwdriver and a clean rag.
Unscrew the screws securing the flame indicator cover 10 (see Fig. 1), remove the flame indicator and wipe it with a clean rag, clean the holes for the indicator eyes flame in the bottom of the burner stabilizer.
Assemble in the reverse order, paying attention to the correct connection of the glow plug wires.
Carry out a test run.
Maintenance after 500 hours of heater operation
Perform the work provided for after 100 hours of operation, and, if necessary (if smoke and flame are emitted from the exhaust pipe), check the condition of the burner and heat exchanger, the operability of the fuel pump.
To do this, loosen the tightening screw of the halves of the air blower mounting clamp 3 (see Fig. 1), unscrew the burner mounting bolts 9, remove the burner without damaging the gasket, remove the flame swirler 13.
Clean the spark plug, flame swirler, burner, gas ducts from soot and blow them out with compressed air.
Assemble in reverse order
To check the operation of the fuel pump, disconnect the tube from the spark plug bushing nipple, drain the fuel into a container and check if there is a fuel supply.
Maintenance after 1000 hours of heater operation
Perform the work provided for by the maintenance after 500 hours of heater operation.
Seasonal maintenance
Perform the work provided for by the maintenance after 500 hours of heater operation.
Liquid maintenance heater electric pump
During TO-2, check the tightening and tighten the bolts securing the electric pump, check the wire connections (plug connectors).
After 500 hours of operation of the electric pump, additionally do the following:
- - remove and disassemble the electric pump;
- - check the condition of the brush assembly.
To do this, remove the cover from the collector side, inspect the brushes and the collector, make sure that the brushes move freely in the brush holders and fit well against the collector;
- check the height of the brushes.
Replace brushes worn to 5 mm, for which unsolder the worn ones and solder new ones with POS 40 solder, GOST 21931-76*;
- check the condition of the working surface of the collector, which should not have any traces of burning or contamination.
If there is contamination, wipe the collector with a clean cloth soaked in gasoline.
If this method does not remove contamination or burning, clean the collector with fine sandpaper (15A, 4MA, GOST 6456-82);
- if the burning is not cleaned with sandpaper, grind the collector until a clean smooth surface is obtained.
The cleanliness of the processing after turning should be 1.25 microns.
After turning, remove the insulation between the collector plates to a depth of 0.5 mm.
For this, use a hacksaw blade sharpened to the thickness of the insulation or a special cutter.
The insulation must be removed across the entire width.
Then remove burrs with sandpaper;
- - blow dry compressed air through the electric motor before assembly;
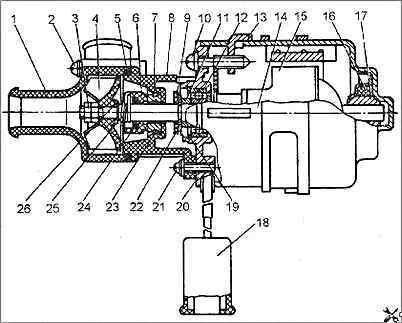
- - lubricate the electric pump bearing - plain bearing 17 (Fig. 1) two or three drops of oil 132-21, dropping them on the felt washer 16.
A closed bearing is used in the cover 20 of the electric pump electric motor, in which the lubricant is laid at the manufacturer's plant and is not changed;
- inspect the pump, the mechanical seal, through which (if it is in good condition) there should be no leakage of liquid.
The electric pump is disassembled in the following sequence:
- - unscrew the four screws 2 and remove the cover 1 of the pump;
- - unscrew the two nuts 3 and remove the impeller 4 of the pump, washer 26 and spring 25;
- - unscrew the two inta 21 and remove the pump housing 8 together with the mechanical seal parts, the bushing 6 with the sealing ring 24 and the bushing 7 with the sealing ring 23;
- - unscrew the two screws 10;
- - remove the two squares 13 from the housing 14;
- - remove the cover 20 from the housing 14 together with the anchor 15;
- - remove the rubber sealing washer 9 from the anchor shaft;
- - remove the lock washer 22 from the anchor shaft;
- - remove the anchor 15 from the cover 20;
")

")
")
")
")
")
")
")