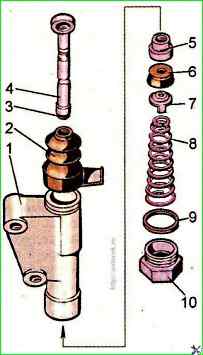
Disassembling and repairing the ZIL-5301 clutch master cylinder
To disassemble the clutch master cylinder, secure it in a vice and remove the pusher 4 together with the rubber boot 2
Unscrew the plug 10, remove the gasket 9, the spring 8 together with the holder 7 and squeeze the piston 5 with the cuff 6 out of the master cylinder.
Wash the master cylinder parts in a solution of MS-6, MS-8 TU 6-15-978-76, blow them with compressed air.
To assemble the master cylinder, install its body in a vice.

Lubricate piston 5 (see Fig. 1) and cuff 6 with brake fluid "Neva" TU 6-01-1163-82 and install in the master cylinder.
Install spring 8 in assembly with holder 7, plug 10 with gasket 9 in the master cylinder and tighten the plug.
The tightening torque of plug 10 should be 160-200 Nm.
Install pusher 4 in assembly with rubber boot 2 in the master cylinder.
After assembly, it is necessary to check the tightness of the master cylinder.
To do this, connect a hose with a pressure gauge to the hole in plug 10, plug the hole on the housing with a KG 1/8 plug, pour liquid into the housing, removing air from under the piston and create a pressure of 6.5-7.0 MPa.
The tightness is considered satisfactory if the pressure drops by no more than 0.5 MPa in 30 seconds.
The most vulnerable point is the joint between the body and the plug.
You need to monitor the copper gasket 9.
If it is hard (rigid), it needs to be annealed.


