The wheel brakes have two brake shoes with friction linings attached to them.
The shoes are mounted on axles with eccentric journals that allow the shoes to be centered with the brake drums.
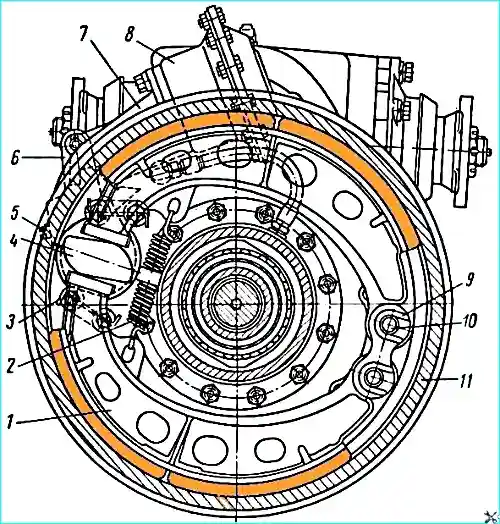
When braking, the shoes are moved apart by the fist 4 and pressed against the inner surface of the drum 11.
Wheel brake adjustment can be complete or partial.
Before both complete and partial adjustment, it is necessary to check the correct tightening of the wheel hub bearings.
When adjusting, the brakes must be cold.
Complete adjustment is carried out only after disassembling and repairing the brakes or disrupting the concentricity of the working surfaces of the brake shoes and drums as a result of loosening the shoe axles.
Complete adjustment must be carried out in the following order:
- 1. Loosen the nuts securing the brake shoe axles and bring the eccentrics closer together, turning the axles with the marks toward each other.
The marks are placed on the outer ends of the axles protruding above the nuts.
Loosen the nuts securing the bolts of the brake cam bracket.
- 2. Apply compressed air to the brake chamber at a pressure of 1-1.5 kg/cm 2 (by pressing the brake pedal if there is air in the system or use compressed air from a garage unit).
If there is no compressed air, remove the brake chamber piston pin and, pressing the adjusting lever in the direction of the brake chamber piston stroke during braking, press the shoes to the brake drum.
By turning the eccentrics in one direction and the other, center the shoes, ensuring their tight fit to the brake drum.
Check the fit of the shoes to the drum with a feeler gauge through a window in the brake drum at a distance of 20-30 mm from the outer ends of the linings.
The 0.1 mm feeler gauge should not pass along the entire width of the lining.
- 3. Without stopping the supply of compressed air to the brake chamber, or if there is no compressed air, without releasing the adjusting lever and holding the shoe axles from turning, securely tighten the axle nuts and the nuts of the bolts securing the expander cam bracket to the brake support disc.
- 4. Stop the supply of compressed air, or if there is no compressed air, release the adjusting lever and attach the brake chamber rod.
- 5. Turn the worm axle of the adjusting lever so that the brake chamber rod stroke is within 15-25 mm.
- Make sure that when the air supply is turned on and off, the brake chamber rods move quickly, without jamming.
- 6. Check how the drums rotate when unbraked. They should rotate evenly and freely, without touching the pads.
With the specified adjustment, the following gaps may be present between the brake drum and the pads: at the expansion cam 0.4 mm, at the pad axles 0.2 mm.
Partial adjustment is performed to reduce the gap between the pads and the drum, which increases due to wear of the linings.
The presence of large gaps, which require partial adjustment, is detected by the increase in the stroke of the brake chamber rods, which should not exceed 40 mm.
Partial adjustment is performed only by rotating the axles of the worms of the adjusting levers, as well as with full adjustment.
With partial adjustment, do not loosen the nuts of the pad axles and change the installation of the axles, as this can lead to a violation of the tight the fit of the shoes to the drum during braking.
If the axle alignment is changed, a full adjustment must be made.
When performing both full and partial adjustment, the minimum stroke of the brake chamber piston rods must be set (about 15 mm).
To achieve equal braking efficiency for the right and left wheels, the strokes of the piston rods of the right and left chambers on each axle should differ little.

Maintenance of the wheel brakes consists of adjusting the gaps between the shoes and drums, as well as periodic inspection, cleaning of the brakes and checking of the fasteners.
During inspection it is necessary to mo check the following:
- 1. Reliability of fastening of brake discs to axle journals.
- 2. Tightening of brake shoe axle nuts and nuts of brake shoe bracket bolts.
- 3. Condition of friction linings:
- a) if the distance from the lining surface to the rivet heads is less than 0.5 mm, then the brake linings must be replaced;
- b) it is necessary to protect the linings from oil, since the friction properties of oiled linings cannot be fully restored by cleaning and washing;
- c) if one of the linings of the left or right brake needs to be replaced, then all linings of both brakes (left and right) must be replaced.
- 4. Condition of brake shoe axles. If the pads do not rotate freely on the axles, then it is necessary, without disturbing the installation of the axles, to remove the pads, clean the working surfaces from rust and lubricate them with a thin layer of consistent grease.
After installing the pads, remove excess grease.
- 5. Expanding cam shafts. The shafts must rotate freely in the bracket without jamming. Lubricate the shafts in accordance with the lubrication chart.
It should be borne in mind that the amount of grease should be moderate, since excess grease can get into the brake.
- 6. Pedal action. After pressing, the pedal should easily return to its original position; if this does not happen, then it is necessary to check the action of the release spring and the movement of the brake valve drive parts, which should be free.
In Fig. 2 is the installation size, according to which the shoe must be machined after installing new friction linings.
The shoe radius size (210 -0.4 mm) is given in relation to new drums.
After repair boring of the drum, the shoe radius must be equal to the drum radius.
")

")
")
")
")
")
")
")