Set the wheels to the straight-ahead position of the car.
Disconnect the negative terminal of the battery.
Remove the steering wheel (article - Removing the steering wheel of the Lada Priora)

Turn the three fuse box cover locks counterclockwise by 90°, releasing its lower part

Removing the fuse box cover
Removing the steering column switches

Unscrew the four screws securing the instrument panel

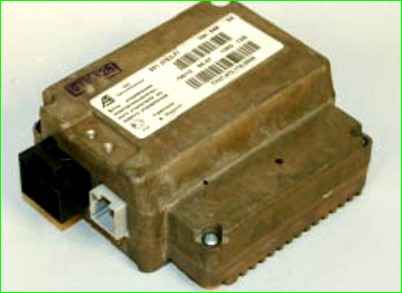
Removing the amplifier

Disconnect the wiring block from the steering column switch connector

Press the lock

Disconnecting the immobilizer reading coil wire blocks

Disconnecting the immobilizer reading coil wire blocks

Press the lock

And disconnect the wiring block from the connector of the electromechanical power steering control unit

Also disconnect the second block of wires from the control unit

Unscrew the nut of the clamping bolt of the universal joint of the electromechanical amplifier from the side of the cardan shaft of the steering gear and remove the bolt

Unscrew the two upper nuts securing the electromechanical amplifier to the body, unscrew the two lower nuts by 3-4 turns

And we remove the electromechanical amplifier from the car

This is what the steering shaft assembly looks like after being removed from the car

Loosen the clamp of the steering column switch connector

And remove the connector

Unscrew the screw securing the protective cover

Removing casing

Press the lock

And disconnect wiring harness connector from the electromechanical power steering control unit

Also disconnect the second wiring harness connector from the control unit

Unscrew the two screws securing the control unit to the electromechanical power steering bracket

Removing the control unit
We install the electromechanical booster in the reverse order.

If the steering wheel does not lock well in the specified position when adjusting the height, you need to tighten the locking stud nut.
Removing and installing the steering cardan shaft

Unscrew the nut

Remove the bolt of the clamp that holds the upper and lower hinges

Marking the position of the cardan joint on the shaft of the electromechanical amplifier

Unscrew the universal joint clamp bolt nut and remove the bolt from the clamp

Removing the cardan shaft from the joint

Moving the joint off the splined shaft of the electromechanical booster

Marking the positions of the cardan shaft on the drive gear

Unscrew the nut

And remove the bolt from the mounting clamp

We spread the clamp with a screwdriver

And we remove the cardan shaft from steering gear drive pinion

This is what cardan joint 1 and cardan shaft 2 with the joint look like.
We install the cardan shaft in the reverse order.
")

")
")
")
")
")
")
")