Checking the technical condition of the timing drive
Remove the top cover.
Check the timing belt (A) for damage, oil or coolant ingress
If oil or coolant has leaked onto the belt, you need to replace it.
Remove oil from the surface of the belt if it gets on the belt.
Check the camshaft gear.
Check the camshaft gear, crankshaft, tensioner pulley, pulley for wear and damage. Replace parts if necessary.
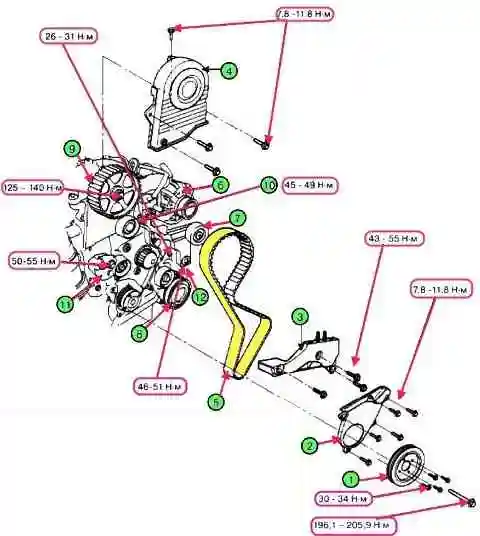
1 - Crankshaft pulley; 2 - Lower timing belt cover; 3 - Engine mounting bracket; 4 - Top cover of the timing belt; 5 - Timing belt; 6 - Generator and vacuum pump assembly; 7 - Power steering pump pulley; 8 - Air conditioning compressor; 9 - Camshaft drive gear 10 - Timing belt idler pulley; 11 - Timing belt tensioner; 12 - Intermediate pulley-
Check the tensioner pulley and pulley for noise by turning them smoothly. Replace parts if necessary.
If the pulley has smudges of dirt from the bearing, replace the pulley.
Remove drive
Remove the front right wheel of the car.
Remove the side cover.

Pull up the belt tensioner to remove the accessory drive belt (A).

Remove the mounting bolts and nuts and remove the engine mounting bracket (A).

Remove the mounting bolts and remove the upper timing belt cover (A).

Remove the mounting bolts and remove the crankshaft pulley (A).

Remove the mounting bolts and remove the lower timing belt cover (A).
If you remove the tensioner, performance will deteriorate.

Remove the mounting bolts and remove the engine support bracket (A).

Align the alignment marks (A, B) on the camshaft gear (C) and crankshaft gear (D) with the marks (E, F) on the cylinder head (G) and on the oil pump housing (H), turning the crankshaft shaft.

Install the pin (A) into the aligned holes in the belt tensioner housing (B).
Using a socket wrench (5 mm) (A), loosen the locking bolt (B).

Then, turn the tensioner (C) clockwise until it stops together with the main bolt (D) and a 12 mm ring wrench (E), tighten the locking bolt (B).
Remove the timing belt.
If the belt is to be reused, and before removing it, it is necessary to put a mark indicating the direction of rotation.
Drive installation

Align the timing marks (A) on the camshaft gear (B) with the mark (C) on the cylinder head (D).

Align the match marks (A) on the crankshaft gear (B) with the pin (C) installed in the oil pump housing (D).

Install the timing belt.
Installation must be carried out in the following sequence: crankshaft gear (B) ► water pump pulley (C) ► intermediate pulley (D) ► camshaft gear (E) ► timing belt tensioner (F).

- - Turn the automatic tensioner (C) counterclockwise until it stops.
- - Rotate the crankshaft manually one full revolution (clockwise) to set the piston of the first cylinder to TDC
Using the special wrench, tighten the locking bolt. Tightening torque10-12 Nm.

Remove lock pin and tensioner (A).

Install the lower engine support bracket.
Tighten the fastening bolts with a tightening torque of 43-55 Nm.5.

Install the upper (A) and lower cover (B) of the timing belt.
Tighten the mounting bolts with a tightening torque of 7.8-11.8 Nm
In order to install the belt (A), you need to lift up the tensioner.
Install the crankshaft pulley. Tighten the fastening bolts with a tightening torque of 30-34 Nm.
Install the engine mount bracket.

Install the accessory drive belt as follows: alternator ► power steering ► pulley ► compressor ► crankshaft pulley ► tensioner.
Install the side cover.
Install the right front wheel.
")

")
")
")
")
")
")
")