The parking light is on when the exterior lighting switch is pressed (fully or partially). At the same time, the rear license plate lamps also light up
The interior lamps light up if one of the doors is open or the lamp switch is in the appropriate position.
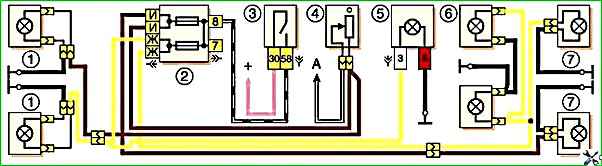
Scheme for switching on external lighting: 1 - side light lamps in the front lights; 2 - fuse block; 3 - external lighting switch; 4 - instrument lighting switch; 5 - indicator lamp for external lighting in the instrument cluster; 6 - license plate lights; 7 - side light lamps in the rear lights; A - to the lighting lamps of the instrument cluster, switches and backlight panel
The instrument lighting turns on simultaneously with the exterior lighting.
The brightness of the backlights is controlled by the light switch (rheostat) on the instrument panel.
The reverse lamps light up when the ignition is turned on and the reverse switch located on the gearbox is closed.
To turn on the rear fog lights, there is a corresponding button on the instrument panel.
Voltage is supplied through fuse No. 13 (8 A), located in the lower block.
The rear fog lights can only be turned on if the exterior lights are on.
Headlight repair was discussed in the article - “Headlight repair.”
Removing the front light, replacing lamps

To replace the lamps, use a slotted screwdriver to unscrew the two screws securing the diffuser

Remove the diffuser

Press lightly on the lamp, turn it counterclockwise and remove it

To remove the flashlight, use the “8” head to unscrew the two nuts securing the flashlight to the plastic bracket

Pull the lantern towards you

Remove the plastic case
Having marked the wires, disconnect them and remove the flashlight.

To remove the flashlight assembly with the bracket, disconnect the flashlight wire block in the engine compartment.

Use a Phillips screwdriver to unscrew the two screws securing the light bracket to the body

Remove the lantern assembly with bracket
Install the lamp in the reverse order.
Removing the side turn signal, replacing the lamp

To replace the lamp, remove the socket with rubber cover from the indicator housing.

Remove the lamp from the socket.

To remove the housing and casing of the side turn signal, use the “8” socket to unscrew the two nuts

Remove the housing with the rubber gasket from the outer surface of the wing, and the casing from the inside

Install the side turn signal in the reverse order
")

")
")
")
")
")
")
")