Remove the wheel from the car in the following order:
Loosen the wheel nuts
Hang the wheel to be replaced with a jack.
Unscrew the wheel nuts and remove the wheel from the hub.
Install the wheel onto the hub in reverse order.
When disassembling and assembling tires, observe the following:
- – only clean, serviceable tires, tubes and wheel rims that correspond to the size and type of tires are subject to assembly;
- – only fill new tires with new tubes;
- – disassemble and reassemble tires on the road using special blades included in the driver’s tool kit; in garage conditions
- – using special equipment;
- – disassemble and reassemble tires in conditions that prevent sand and dirt from getting on the tubes and tires.
Disassemble the tire in the following order:
Completely release the air from the chamber by unscrewing the valve spool.
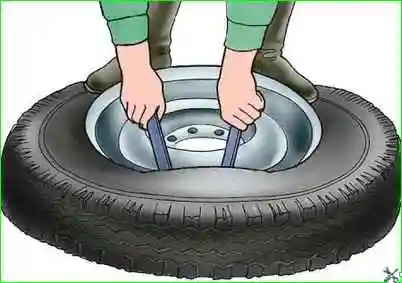
Tuck part of the tire bead (on the side opposite the valve) into the recess of the wheel disk, and then use the mounting blades to move the tire bead through the disk, starting the operation at the valve (Fig. 1).
If the tire sticks to the rim, separate its beads using a jack, using, for example, the weight of the car.
To do this, place the wheel under the car, place the jack on the tire near the wheel disk (for the outer bead, always on the side opposite the valve), place a board under the base of the jack and begin lifting the car.
After several pumps of the jack handle, the tire will easily fall away from the disc.
Push the valve out of the disc hole and remove the camera.
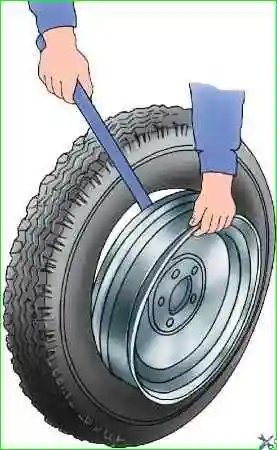
Slide the other bead of the tire into the recess of the disk and, placing the blades, as shown in fig. 2, remove the tire.
If disassembling the tire is only to replace the tube, remove only one bead of the tire from the rim from the valve side.
Assemble the tire in the following order:
Place the disc with the hole for the camera valve facing up.
Powder the tire (inside) and the tube with a thin layer of talc over the entire surface, remove excess talc.
To make assembly easier, lubricate the tire bead with soapy water.
Place the tire on the wheel with the serial number on top.
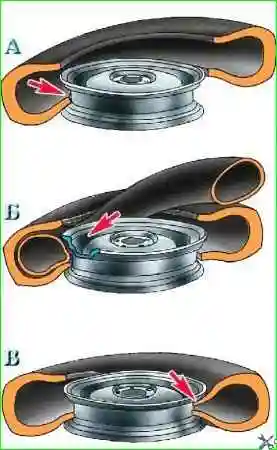
Using mounting blades, install the inner bead of the tire (Fig. 3, A) onto the wheel disk and insert it into the recess of the disk.
Insert the chamber valve into the hole in the disk and carefully insert the chamber into the tire (Fig. 3, B).
Inflate the chamber until it is straightened and in the correct position on the disk, and then release the air.
After making sure that the lower bead of the tire is in the recess of the disk, use mounting blades to place the outer bead of the tire onto the disk (Fig. 3, B).
Start filling the outer bead of the tire on the side opposite the valve, and continue in both directions, moving closer to it.
At the same time, make sure that the valve is positioned correctly in the hole of the disk, avoiding its distortion.
As you put on the bead, move the tucked part of the tire into the recess of the disk.
Inflate the tube to normal pressure, then completely deflate it and re-inflate it to ensure the correct (without folds) position of the tube in the tire.
")

")
")
")
")
")
")
")