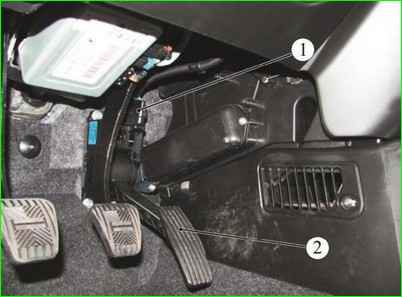
The gas pedal is electronic; it has no mechanical connection with the throttle valve. The engine control is completely electronic.
The driver, by pressing the gas pedal, only indicates how much acceleration he would like to give to the car, and the engine control system implements this.
The same thing happens when the driver loosens the pressure on the gas pedal, holds it down in one position, or completely removes his foot from the gas pedal.
This system is called “E-gas” (E-GAZ). Engines with such a system can meet EURO IV─V environmental standards.
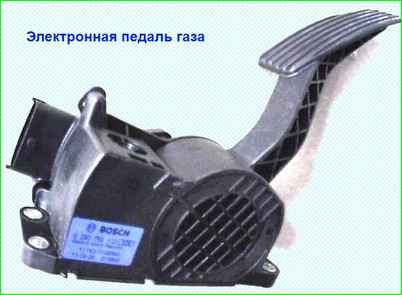
The electronic gas pedal consists of a plastic lever, which is integral with the pedal and two sensors built into the bracket.
All elements form a single structure, which is sometimes called the gas pedal module.
Each gas pedal position sensor (built into the gas pedal bracket) is a potentiometer, the moving contact of which is rigidly connected to the rotary axis of the pedal lever.
The electronic control unit (ECU) continuously monitors the position of the pedal using sensor signals.
The change in position is controlled by the changing resistance at the terminals of both sensors.
In accordance with these parameters, the ECU sends control commands to the throttle gear motor and fuel injectors.
As a result of wear of the moving contacts or conductive tracks, the sensors may fail or the signals coming from them will be incorrect.
If the signals are violated, the engine will operate unstably, and “failures” are possible in transient conditions.
When idling, the engine speed may change spontaneously.
If one of the sensors (or its circuit) fails, the engine control system fault warning lamp will light up.
If the signal from the sensor is not restored within the control time, the ECU will switch the system to backup mode.
In this mode, when you sharply press the gas pedal all the way, the speed will increase slowly.
The car will be able to continue driving to the repair site under its own power.
There may be a slight increase in fuel consumption and changes in some other technical parameters of the engine.
If both sensors fail, the ECU will switch the engine management system to emergency operation mode, the engine will only operate at speeds slightly above idle (1500 min -1).
At the same time, the car retains the ability to move independently, albeit at a slow speed.
This will allow you, if necessary, to leave the intersection, pull over to the side of the road, or move the car to a safe place a short distance.
Check and replacement
The gas pedal position sensor cannot be repaired; in case of a malfunction, the electronic gas pedal must be replaced as an assembly.
The need for work is determined during a check of the technical condition of the engine control system.
You will need a multimeter to complete the work.
Withdrawal
Disconnect the negative terminal from the battery.

Press the clamps of the wiring harness block and disconnect the block from the gas pedal sensor.

Use a 10 mm socket wrench to unscrew the three nuts securing the gas pedal.

Remove the gas pedal from the studs
Check
Using a multimeter in ohmmeter mode, you can check the condition of the moving contacts and conductive paths of the gas pedal position sensors. To do this:

Connect one multimeter probe to pin 4, and the other to pin 2.
Slowly moving the gas pedal, we control the electrical resistance on the device, which should gradually decrease.

Repeat the test by connecting the multimeter to pins 4 and 3.

We similarly check the conductive path of the other sensor, connecting the multimeter in series to pins 1-6 and 6-5.
If, when checking any of the tracks, the resistance changes abruptly, the sensor should be replaced.
Installation
Install the gas pedal in reverse order.
To avoid accidentally bending the leads in the gas pedal sensor connector, connect the wire block before installation.
Then we put the gas pedal bracket on the studs.
Tighten the pedal mounting nuts to 6 - 8 Nm.
Pedal block terminal values table:
Pin No. - sensors - Pin assignment
- - sensor No. 2 - voltage + 3.3 V;
- - sensor No. 1 - voltage + 3.3 V;
- - sensor No. 1 - “ground”;
- - sensor No. 1 - signal from sensor No. 1;
- - sensor No. 2 - “ground”;
- - sensor No. 2 - signal from sensor No. 2
When operating, you need to remember that your car is equipped with pedals connected to electronics.
Try to prevent moisture from getting on the pedals. You need to use mats, etc.
")

")
")
")
")
")
")
")