A car with a ZMZ-406 and ZMZ-405 engine is equipped with a generator 9422.3701 or 2502.3771
The generator is a three-phase synchronous electrical machine with electromagnetic excitation and a built-in rectifier using silicon diodes.
The generator rotor is driven by a poly-V-belt from the engine crankshaft pulley.
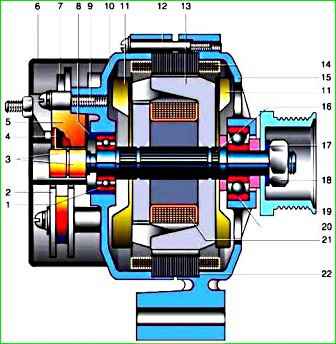
The stator and generator covers are secured with four screws.
The rotor shaft rotates in bearings installed in the covers.
The bearings are lubricated for their entire service life.
The rear bearing is pressed onto the rotor shaft.
The front bearing is installed on the inside of the front cover.
The back of the generator is covered with a plastic casing.
The generator stator has two three-phase windings, made in a star configuration and connected in parallel to each other.
The rectifier is a bridge circuit and consists of six power limiting diodes or conventional ones (on some generators).
They are pressed into two horseshoe-shaped aluminum holder plates.
One of the plates also contains three additional diodes, through which the excitation winding of the generator is powered after the engine starts.
The generator excitation winding is located on the rotor. The winding leads are soldered to two copper slip rings on the rotor shaft. Power is supplied to them through two carbon brushes.
The brush holder is structurally combined with the voltage regulator.
The voltage regulator is non-separable; if it fails, it is replaced.
To protect the vehicle’s electronic equipment from voltage pulses in the ignition system, as well as to reduce radio interference, a capacitor is installed between the “+” terminal and the “ground” of the generator.
The generator windings and the rectifier unit are cooled by the fan impeller through windows in the covers.
Removing the generator of a GAZ-2705 car
Disconnect the wire from the negative terminal of the battery.

Disconnect the wires from the three generator terminals.

Remove the generator drive belt.
Unscrew bolt 2 of the lower mounting of the generator.
Unscrew nut 1 of the upper fastening, while holding the bolt with a wrench to prevent turning

Loosen bolt 2, remove bolt 1 and remove generator
Disassembling the generator
Clean the generator from dust and dirt.

Remove the back cover by releasing the three latches.

Unscrew the two screws 1 and remove the brush holder 2 with the voltage regulator assembly.

Unscrew the fastening screw and remove the capacitor installed under the brush holder.
Disconnect block 1 with wire from capacitor 2. Unscrew the four screws 3, bend the terminals 4 of the winding and remove the rectifier block.

Unscrew the four coupling bolts 1 and remove the cover 2 from the side of the slip rings, passing the leads 3 of the winding through the holes.

Remove the stator with winding from the cover on the drive side.

Lightly clamp the anchor in a vice and unscrew nut 1 securing the pulley. Using a puller, remove pulley 2
Press the armature out of the cover on the drive side.
If replacement is necessary, press the bearings off the armature shaft
Inspection and testing of generator parts

Check the serviceability of the voltage regulator. Connect a 12 V test lamp to the brushes.
Apply a voltage of 12 V “+” to the terminal and “–” to the “ground” of the brush holder. In this case, the control lamp should light up.
If the control lamp does not light, the voltage regulator must be replaced.
Check the brushes below.

Inspect the slip rings.
If burrs, marks, scratches, signs of wear from brushes, etc. are found, the rings must be sanded.
If the damage to the rings cannot be removed with sandpaper, you can grind the rings on a lathe, removing a minimum layer of metal, and then grind them.
After grooving, check the runout of the rings using an indicator.
The maximum permissible runout is 0.08 mm. If the runout value exceeds the specified value, replace the armature.

Check the resistance of the armature winding with an ohmmeter (tester), connecting it to the slip rings.
The armature resistance should be in the range of 2.35–2.6 Ohms at 20 °C.
Check with a test lamp whether the winding is shorted to the armature body.

To do this, turn on the test lamp to a 220 V AC power supply (you can use a battery and a 12 V lamp).
Connect one wire to the armature body, and the second - to each ring in turn.
In both cases, the lamp should not light.
If in at least one case the lamp is on, it means there is a short circuit and it is necessary to replace the armature or winding.

Inspect the stator. There should be no traces of the armature touching the stator on the inner surface of the stator.
Otherwise, replace the armature shaft bearings or generator cover.
Check whether the stator windings are shorted to the housing.
To do this, turn on the test lamp to a 220 V AC power supply (you can use a battery and a 12 V lamp).
Connect the lamp to the terminal of the stator winding, and the wire from the current source to the stator housing, but the lamp should not light.
If the lamp is on, this indicates that there is a short circuit in the winding, therefore, it is necessary to replace the stator or winding.

Check for a break in the stator winding. To do this, turn on the test lamp to a 220 V AC power supply (you can use a battery and a 12 V lamp).
Connect a test lamp one by one between all winding terminals.
In all three cases the lamp should be on.
If in at least one case the lamp does not light, then there is a break in the winding and the stator or winding needs to be replaced.

Check the diodes of the rectifier unit using a 12 V test lamp and a battery.
To check the Residential diodes 1, connect the “–” battery through a test lamp to the positive plate of the rectifier unit, and connect the wire coming from the “+” battery in turn to the contact of each positive diode (red diagram).
In each case, the lamp should be lit.
Then change the polarity, i.e. Connect the “+” battery through a test lamp to the “positive” plate of the unit, and connect the wire coming from the “–” battery to the contact of each diode in turn, and the lamp should not light up in each case.
To check negative diodes 2, perform similar actions (blue diagram). If the above conditions are not met, the rectifier unit must be replaced.
Inspect the generator covers. If cracks are found, especially in the places where the generator is attached, the covers must be replaced.
Measure the diameters of the bearing seats. The diameter in the cover on the slip ring side should be (35.0±0.012) mm, on the drive side - 47.0+0.027 mm.
Lids must be replaced if the diameters do not fall within the specified limits.
Check that the bearings rotate easily. If, when they rotate, there is any play between the rings, rolling or jamming of the rolling elements, such bearings must be replaced.
It is also necessary to replace bearings with damaged protective rings or signs of lubricant leakage.
Assemble the generator in the reverse order of disassembly.
Install the generator in the reverse order of removal. After installing the generator, adjust the tension of the generator drive belt
Checking and replacing generator brushes
Disconnect the wire from the negative terminal of the battery

Disconnect the wires from the three generator terminals.
Remove the back cover by releasing the three latches.

Unscrew the two screws 1 and remove the brush holder 2 with the voltage regulator assembly.

Check the amount “a” of protrusion of the brushes from the brush holder.
If the value “a” of the protrusion of the brushes in a free state is less than 4.5 mm, it is necessary to replace the brush holder assembly
Check that the brushes move easily in the brush holder.
If the brushes are jammed, the brush holder assembly must be replaced. Brushes with chips, cracks or other defects must also be replaced.
")

")
")
")
")
")
")
")