The crankcase ventilation system removes crankcase gases
The crankcase gases enter the oil separator located on the cylinder block via the exhaust hose.
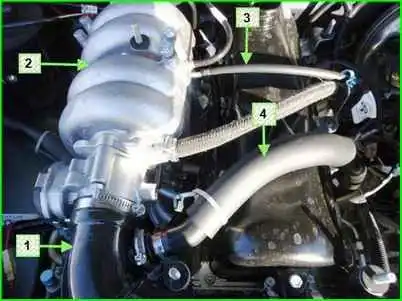
The primary and secondary circuit hoses are two hoses (one small diameter, the other large) through which crankcase gases, having passed the oil separator, are fed to the receiver and then to the combustion chamber.
The primary circuit has a calibrated opening - a jet with a diameter of 1.7 mm.
The jet is located in the primary circuit hose (small diameter hose) on the side connected to the oil separator fitting.
The primary circuit hose goes from the oil separator to the receiver.
The secondary circuit hose (larger diameter hose) goes from the oil separator to the intake pipe hose.
At idle, all crankcase gases are fed through the primary circuit jet (small diameter hose). In this mode, a high vacuum is created in the intake manifold, and crankcase gases are effectively sucked into the throttle space.
The jet limits the volume of gases sucked out so that the engine does not interfere with idle operation.
In load modes, when the throttle valve is partially or fully open, a small amount of crankcase gases passes through the first circuit jet.
In this case, their main volume passes through the second circuit (large diameter hose) into the intake pipe hose in front of the throttle pipe and is then burned in the combustion chamber.
ATTENTION. In the absence of a 1.7 mm jet, the ECM erroneously determines an overestimated value of leaks through the throttle valve (the nominal value determined by the manufacturer is 3 - 5 kg / h), which leads to instability of idle speed.
Cleaning the crankcase ventilation system
Over time, resinous deposits from crankcase gases accumulate in the engine crankcase ventilation system, making it difficult for these gases to be removed into the engine cylinders for combustion.
Because of this, the gas pressure inside the engine increases, and oil leaks appear through the seals. To avoid this, periodically clean and flush the system.
Clean the crankcase ventilation system before each oil change.
You will need: a screwdriver, a 13 mm wrench, kerosene for flushing, clean rags, a container for flushing the parts.
The oil separator mounting nut is difficult to access without a special tubular wrench. If there is no such key, clean the oil separator without removing it from the engine.
If a large amount of kerosene gets into the engine crankcase while cleaning the oil separator, change the oil in the crankcase.
Cleaning the crankcase ventilation system
Remove the high-voltage wire tips from the spark plugs
Remove the oil level dipstick from the guide tube

Unscrew the nipple of the oil supply tube to the hydraulic tensioner of the timing chain from the hole in the cylinder block and unscrew the two bolts securing the tube holders

Use a screwdriver to loosen the clamp securing the main crankcase ventilation hose

Remove the hose from oil separator cover pipe

Using pliers, loosen the clamp securing the idle circuit hose of the crankcase ventilation

And remove the hose from the dipstick guide tube branch pipe

Using a 13 mm open-end wrench, unscrew the cap nut securing the oil separator cover

Remove the copper sealing washer

Remove the oil separator cover, bringing it out between the oil supply pipe to the hydraulic tensioner and the cylinder block wall
The connection between the cover and the cylinder block is sealed with a paronite gasket

Screw two M8 nuts onto the oil separator stud

Lock the nuts with two 13 wrenches
Unscrew the stud by the lower nut with a 13 wrench

Remove the stud from the oil separator

Grab the edge of the oil separator with pliers

Remove the oil separator from the cylinder block socket
Wash the oil separator parts gasoline or kerosene and install in reverse order.
Also flush the ventilation circuit hoses
")

")
")
")
")
")
")
")