Removing the automatic transmission is discussed in the article - "Removing the automatic transmission"
Install the automatic transmission on the workbench
Replace the wheel drive seals.
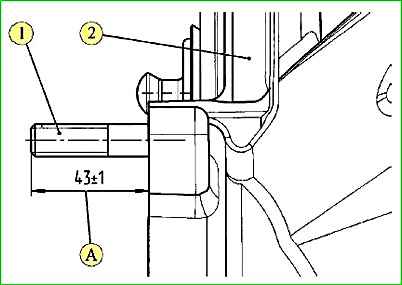
Degrease stud 1, fastening the automatic transmission to the engine in the corresponding threaded hole in the torque converter housing.
Apply sealant to the threaded part of the stud screwed into the housing and screw the stud into the torque converter housing.
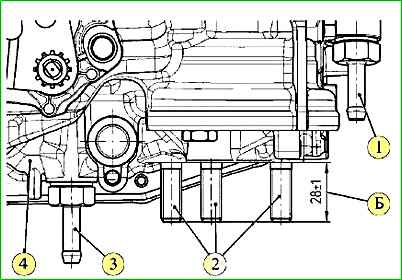
Degrease studs 2, fastenings of bracket of left support of engine mount and corresponding threaded holes in housing of automatic transmission. Screw the studs to size "B" = 28 ± 1 mm.
Install new sealing gaskets on fittings 1, 3 of the oil cooling system, remove the technological plugs from the holes of the automatic transmission oil line and screw in the fittings.
Tightening torque of the fittings 27.2-33.6 Nm (2.8-3.4 kgm)
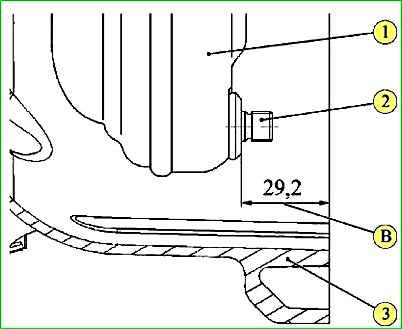
To prevent damage to the automatic transmission, before installing it on the vehicle, make sure that the torque converter engages with the gearbox hydraulic pump, for which check the dimension "B", from the plane of the mating surface of the housing 3 of the torque converter to the plane of the mating surface of the welded bolts 2 of the torque converter.
Make measurements at four points and calculate the average value.
If the obtained value does not correspond to the dimension B = 29.2 mm, it is necessary to rotate the torque converter to engage it with the automatic transmission hydraulic pump and take measurements again.
Install the automatic transmission on the transmission rack and move it under the vehicle.
Align the torque converter bolts with the holes on the engine drive disk, align the mounting holes on the torque converter housing and the housing cover with the holes on the cylinder block and connect the automatic transmission to the engine.
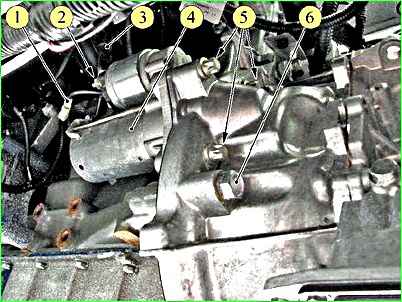
Tighten, without tightening, bolt 6, with a spring washer.
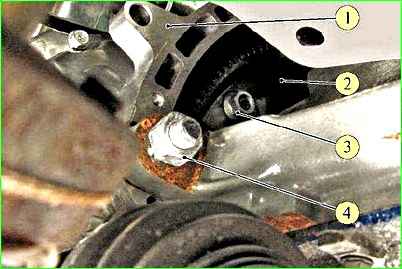
Tighten, without tightening nut 4, with a spring washer of the automatic transmission mounting stud to the cylinder block.
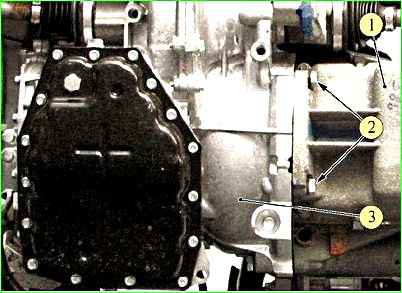
Tighten, without tightening, two bolts 2, with spring washers for fastening the automatic transmission to the engine crankcase
Install the left support bracket on the automatic transmission, assembled with the left engine mount support, and tighten three nuts. Tightening torque of nuts 20.1-32.4 Nm (2.1-3.3 kgfm).
Attach the left support to the car body and tighten, without tightening, two nuts and a bolt with a conical spring washer.
Install the rear support bracket assembled with the rear engine mount support on the automatic transmission and tighten two bolts 2, Figure 6, with flat and spring washers. Tightening torque of bolts 57-92 Nm (5.7-9.2 kgfm).
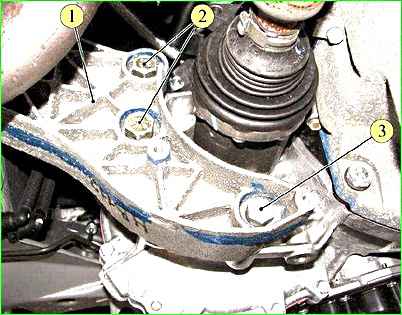
Tighten bolt 3 with flat and spring washer for fastening bracket of rear engine mount. Tightening torque of bolt 32-52 Nm (3.2-5.2 kgfm).
Attach rear support to car body and tighten, without tightening, two fastening nuts.
Tighten bolt and nut for fastening automatic transmission to cylinder block. Tightening torque of the bolt and nut 55-87 Nm (5.5-8.7 kgfm).
Tighten the two bolts securing the automatic transmission to the engine crankcase atelya. Tightening torque of bolts 34-53 Nm (3.4-5.3 kgf.m).
Tighten two nuts and a bolt securing the left engine mount. Tightening torque 33-51 Nm (3.3-5.1 kgf.m).
Alternately, turning the engine crankshaft, tighten the four nuts securing the torque converter to the engine drive disk. Tightening torque of nuts 44-58 Nm (4.4-5.8 kgf.m).
Reinstall the plug of the torque converter housing cover and secure with two bolts. Tightening torque of bolts 4.8-7.8 Nm (0.5-0.8 kgfm).
Remove the struts from under the engine and automatic transmission and lower the car.
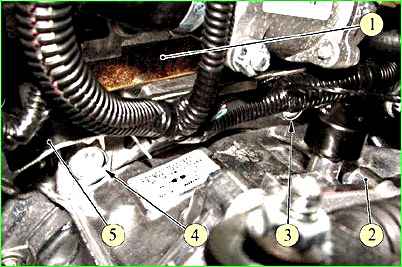
Install bracket 5, fastening the wiring harness and tighten two bolts 3 and 4 with spring washers fastening the automatic transmission to the cylinder block. Tightening torque of bolts 55-87 Nm (5.5-8.7 kgf.m).
Raise the car.
Install the left lower arm of the front suspension with the ball joint, strut and strut bracket assembly.
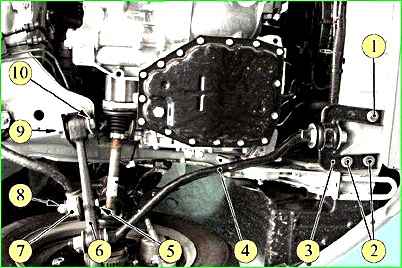
Fasten the strut bracket to the body with two bolts 2, with flat washers and one bolt 1 with a flat washer. Tightening torque of bolts 58-70 Nm (5.8-7.0 kgf.m).
Connect the front suspension arm to the body bracket. Insert the mounting bolt and screw in, without tightening the nut with the spring washer.
Install the front wheel drives, install the washers and screw on the hub mounting nuts, connect the ball pins to the steering knuckles and install the heat shield of the right wheel drive joint in place.
Attach the strut 7, the anti-roll bar to the left lower arm 6 of the suspension, install the bolt 5 and screw on, without tightening completely, the nut 8 with the spring washer.
Install in place starter and secure it with three bolts. The tightening torque of the bolts is 18-24 Nm (1.8-2.4 kgf.m).
Connect the front wiring harness to the starter solenoid terminal. Tightening torque of the nut 10-13 Nm (1.0-1.3 kgf.m).
Connect the block of the front wiring harness to the block of the starter solenoid relay wire.
Remove the technological plugs from the fittings and pipes of the automatic transmission oil cooling system, connect the pipes to the fittings and secure them with clamps.
Install the middle and right engine mudguards in place, and secure with self-tapping screws with toothed washers.
Install the left front fender shield.
Install the front wheels.
Lower the car.
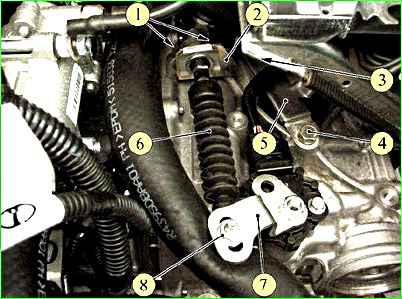
Install bracket 5 on the automatic transmission housing, fastening the wiring harness and secure it with bolt 4 (M10x22) with a spring washer and bolt 3 (M6x14). Bolt tightening torque (M10x22) 32-52 Nm (3.2-5.2 kgf.m). Bolt tightening torque (M6x14) 4-6 Nm (0.4-0.6 kgf.m).
Install the gear selector cable mounting bracket assembled with the cable on the torque converter housing and secure with two bolts. Bolt tightening torque 12-19 Nm (1.2-1.9 kgf.m).
Set lever 7 of the driving mode selection mechanism by rotating it counterclockwise and the gear shift lever to the extreme forward position in the direction of vehicle travel.
Install the cable end in the groove of the lever and tighten the mounting nut. Tightening torque of the nut 21-25 Nm (2.1-2.5 kgf.m).
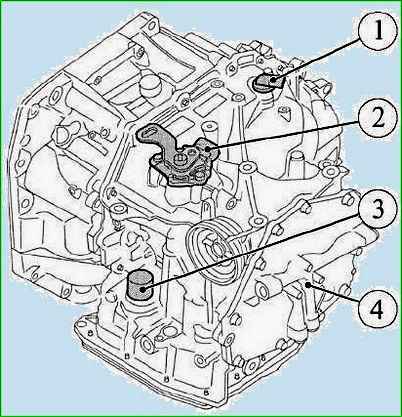
Connect the front wiring harness block to sensor 1, the number of revolutions of the output shaft.
Connect the front wiring harness block to the connector of the mechanism 2 for selecting driving modes.
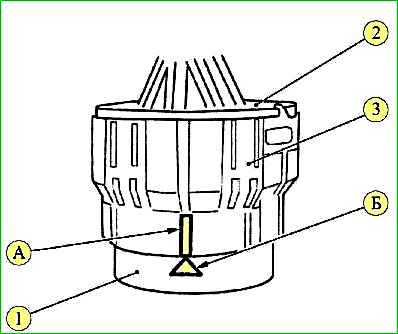
Connect connector 2 of the front wiring harness to the 22-pin connector "I" of the automatic transmission.
Turn locking ring 3 of the connector clockwise until slot "A" aligns with mark "B".
Attention. Do not confuse the slot "A" with other structural elements of the locking ring.
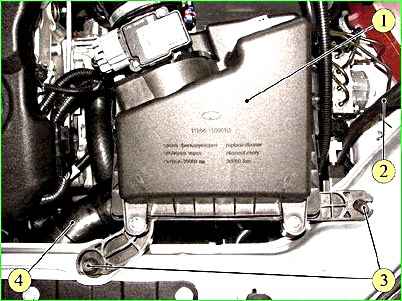
Attach to the air filter housing 1, using the bracket, the steam outlet pipe 2 of the radiator.
Install the air filter with the mass air flow sensor and the intake pipe hose assembly on three mounting supports 3 and attach the air intake pipe 4 to the air filter housing.
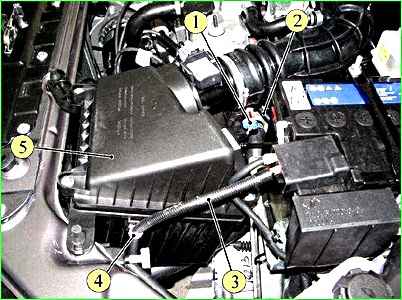
Attach to the air filter housing 5, using the bracket 4, harness 3 front wires.
Connect the connector of the tube 2 steam bleed to the adsorber valve.
Connect the block 1 of the ignition system wiring harness to the adsorber valve.
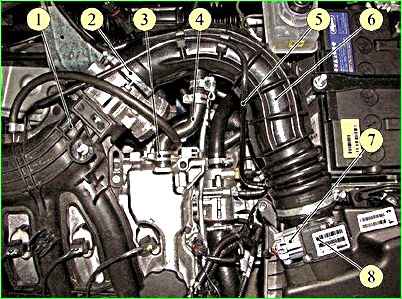
Connect the block 7, figure 15, of the ignition system wiring harness to the sensor 8 of the mass air flow.
Connect the connector of tube 5 of the adsorber valve to the electronic module 1 of the intake.
Connect the hose 6 intake pipe to electronic module 1 intake and tighten clamp 2 fastening.
Put upper hose 4 crankcase ventilation on branch pipe of cylinder head cover and tighten clamp 3.
Install noise insulation screen of engine.
Connect terminal of wire “ground” to storage battery.
Attention. In case of replacement of the automatic transmission or transmission control unit or replacement of the automatic transmission and control unit simultaneously, it is necessary to calibrate the transmission control unit.
Fill the automatic transmission with oil in accordance with the requirements of the article “Oil change”.
Place the car on a lift, apply the parking brake and lift it to a height convenient for work.
Press the front suspension with your hands 2-3 times to self-install its units, applying a force of 400-500 N (40-50 kgf) in the area of the front bumper.
Finally tighten the nuts securing the units and parts of the front suspension.

Tightening torques:
- nuts 1, bolts fastening lower arm 3 of the suspension to bracket 2 of the body 79-96 Nm (7.9-9.6 kgf.m);

- nuts bolt 1. fastening strut 2 of the stabilizer to the lower left arm 3 of the front suspension 43-52 Nm (4.3-5.2 kgf.m)
Check and, if necessary, adjust the front wheel alignment angles.


