We remove the elements and parts of the air conditioning system for replacement, as well as for repair
Removing and installing the air conditioning compressor
Preparing the car for the task, disconnecting the negative terminal of the battery
Bleeding the refrigerant from the air conditioning system
Removing the engine splash guard and engine screen
Disconnecting the wiring block from the windshield washer motor
Removing the washer reservoir and moving it to the side
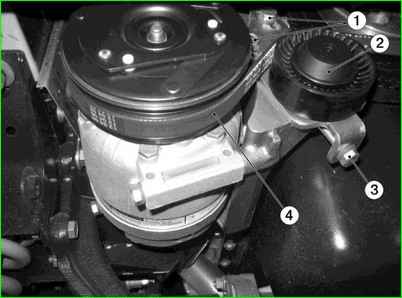
Unscrew bolts 1 (Fig. 1) securing the tension roller bracket by three or four turns
Loosen the tension of the compressor drive belt by turning bolt 3 and remove belt 4 from the compressor pulley
Disconnect the ignition harness connector from the compressor connector
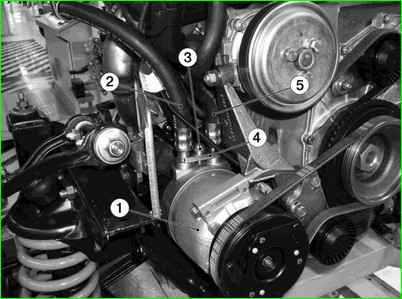
Unscrew bolt 3 (Fig. 2), remove compressor flange 4 and disconnect pipelines 2 and 5 from the compressor
Install plugs on the hoses to prevent compressor oil leakage
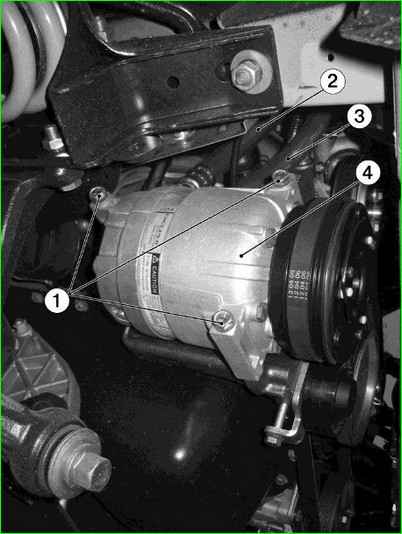
Unscrew three bolts 1 (Fig. 3) securing the compressor to the bracket and remove compressor 4
Installation
Install the compressor on the engine bracket and secure it with three bolts 1 (Fig. 3), the tightening torque of the bolts is 20-24 Nm
Remove the plugs from the pipes and install new sealing rings lubricated with compressor oil
Install the pipelines, compressor flange on the compressor and tighten the flange mounting bolt. The tightening torque of the bolt is 50 Nm
Install the drive belt on the compressor pulley
Tighten the belt by turning bolt 3 (Fig. 1), and tighten the tension roller mounting bolts. Tightening torque of bolts 20-24 Nm
Connect the ignition system plug connector to the compressor connector
Install the washer reservoir and connect the ignition system harness plug connector to the washer pump
Install the engine splash guard and screen.
Connect the negative terminal to the battery
Fill the air conditioning system with refrigerant, according to the documentation for the service equipment
Removing and installing the condenser
Prepare the car and disconnect the negative terminal of the battery
Remove the air filter
Remove the radiator grille
Disconnect the wiring block from the horn and remove the horn signal
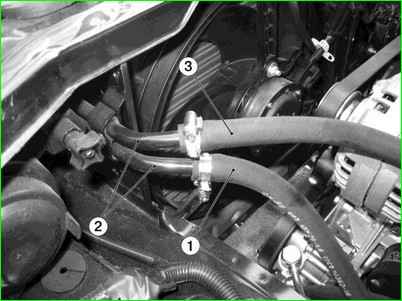
Disconnect low pressure hose 3 (Fig. 4) and hose 1 from the power steering heat exchanger
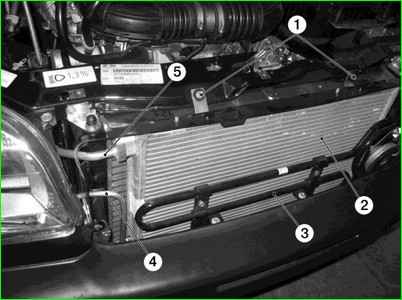
Remove heat exchanger 3 (Fig. 5) of the power steering
Pump out the refrigerant from the air conditioning system, according to the instructions for the service equipment
Disconnect the discharge pipeline 5, condenser pipeline 4 from the condenser and remove the condenser 2
Install plugs on the tubes
Installing the condenser
Install and secure the condenser
Remove the plugs from the pipelines and holes of the condenser
Install new sealing rings on the tubes, lubricated with antifreeze oil
We fix the pipelines on the condenser. Tightening torque of pipeline mounting bolts 7-9 Nm
Install and secure the power steering heat exchanger
Connect the low-pressure hose and low-pressure drain hose to the heat exchanger.
Add fluid to the power steering
Install and secure the horn and connect the wires to it
Install the air filter
Install and secure the radiator trim of the cooling system
Connect the negative terminal of the battery
Fill the air conditioning system with refrigerant.
Bleed the power steering system.
Replacing the condenser with an integrated receiver-dryer, replacing the receiver-dryer cartridge
Preparing the car and disconnect the negative terminal of the battery
Remove the bumper
Pump out the refrigerant from the air conditioning system
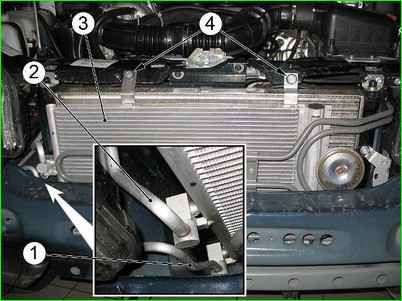
Disconnect tube 1 (Fig. 6) from the condenser to the evaporator and install plugs on the tubes and condenser
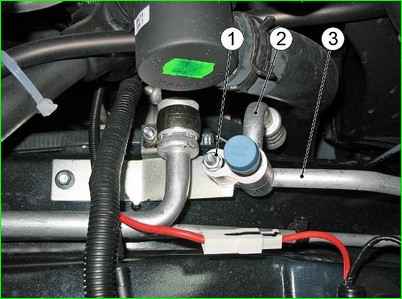
Unscrew nut 1 (Fig. 7) and remove pipeline 2 from compressor to condenser
Unscrew bolts 4 (Fig. 6) and remove condenser 3 together with discharge tube 2
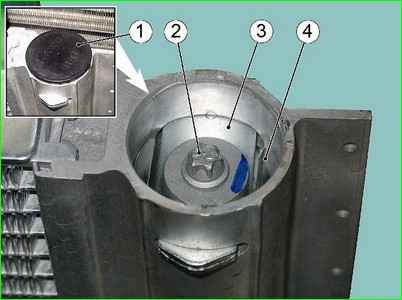
Remove plug 1 (Fig. 8), unscrew bolt 2 and take out fixing plate 3
Screw a technological bolt into the plug until it stops, with a total length sufficient for gripping, with a thread similar to the thread of bolt 2
Using your hand, remove plug 4 and take out the cartridge.
Installation
Install a new cartridge
Insert the plug, having previously replaced the sealing rings and lubricated them with compressor oil
Insert the fixing plate, tighten the bolt and install the plug
Install and secure the condenser
Remove the plugs from the holes in the pipelines and the condenser
Install new sealing rings lubricated with compressor oil oil
Secure the pipelines. Tightening torque of the nut and bolt for fastening the pipelines 7-9 Nm
Fill the air conditioning system with refrigerant
Removing and installing the evaporator
Prepare the car and disconnect the negative terminal of the battery
Remove the engine mudguard
Drain the coolant from the engine cooling system
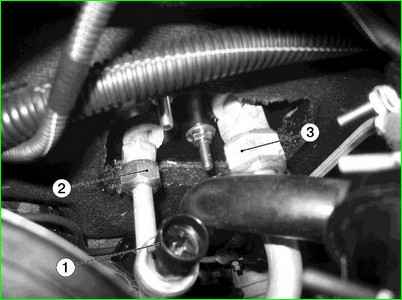
Disconnect the ignition system harness connector from pressure sensor 1 (Fig. 9)
Disconnect the hoses from the heater radiator pipes
Pump out the refrigerant from the air conditioning system
Disconnect low pressure pipeline 3 from the evaporator and pipeline 2 from the receiver
Install the plugs on the pipes
Remove the heater
Remove the evaporator from the heater
Installing the evaporator
Install the heater
Remove the plugs from the holes in the pipes and evaporator tubes
Install new sealing rings lubricated with compressor oil on the tubes
Secure pipelines on the evaporator. The tightening torque of the pipeline mounting nut from the receiver is 15-17 Nm, the tightening torque of the pipeline mounting nut from the compressor is 24-27 Nm
Connect the hoses to the heater radiator pipes
Connect the plug-in connector of the ignition system harness to the pressure sensor
Install the protective plate and engine mudguard
Fill the engine cooling system with coolant
Connect the negative terminal to the battery
Fill the air conditioning system with refrigerant
Removing and installing the receiver-dryer
Prepare the car for the task. Open the hood and disconnect the negative terminal from the battery
Bleed the refrigerant from the air conditioning system
Remove the right headlight
Remove the right fender liner
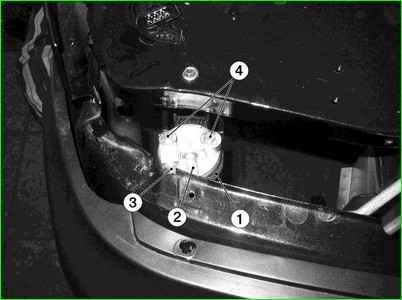
Disconnect pipeline 3 (condenser) and high-pressure pipeline 2 from receiver-dryer 1 (Fig. 10)
Install plugs in the holes of the pipelines and receiver-dryer
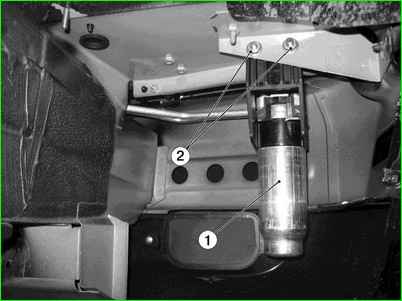
Unscrew nuts 2 (Fig. 11) securing the receiver bracket to the car body
Remove the receiver-dryer with the bracket from the car body
Installing the receiver-dryer
Install and secure the receiver-dryer with the bracket on the car body
Remove the plugs from the holes in the pipes and the receiver-dryer
Install new sealing rings on the pipes, lubricated with compressor oil
Connect the pipes to the receiver and secure them with bolts. Tightening torque of bolts 7-9 Nm
Install the front right fender liner
Install the right headlight
Connect the negative terminal to the battery
Fill the air conditioning system with refrigerant


