When installing a radio, you need to determine what model the car belongs to. The base model does not have wiring for the rear speakers and does not have an external antenna.
But the installation is standard.

Disconnect the negative terminal of the battery

Use a screwdriver to pry up the plastic plug (it is not screwed on)

A cable with two connectors is screwed to the socket under the plug on the right side with tape (if an external antenna is installed, then the antenna plug as well).

One plug is brown, and the other is gray.
The brown plug is connected to the outputs of the radio.
The gray plug is connected to the power supply of the radio (usually these plugs cannot be confused).
In the photo, the brown plug with four wires, for the front speakers, the basic model.
On luxury models, this plug has eight wires, for the front and rear speakers.
In the socket under the receiver, insert the receiver mounting brackets (do not forget to push the plugs with wires through before this).
If not an external antenna is installed, it is best to use an active antenna that is glued to the windshield inside the cabin.

In order to push the antenna wire through, we hook the plastic trim on the right side with a screwdriver and remove it from the instrument panel.
We glue the antenna wires to the glass, and we secure the wire with a harness to the pillar.

Before installing the radio, you need to test it in all modes.
After that, install the receiver in its socket on the sleds.
Once again, check the functionality and assemble all the parts
Install the speakers on the front doors. Let's look at the example of the left door.

Unscrew the lower left screw of the door pocket

Unscrew the middle door pocket screw

Unscrew the lower right door pocket screw

Pulling down, remove the door trim pocket

Squeeze the red clips on the door lock button, remove the door lock button

Using a Phillips screwdriver, unscrew the screw that secures the handle trim

Use an awl to pry up the front handle cap and remove it

Use an awl to pry off the rear cap of the armrest handle mounting screw

Unscrew the two bolts and two screws that secure the armrest handle
Press and remove the door trim.
The trim was removed in order to get to the speaker wires.

The wires are attached with adhesive tape (photo inside the door)

This is how the connectors with wires are attached (the wires are not visible inside, only the tape that holds them is shown)

Removing the wires with the connectors
Connect the speaker. Check the functionality.
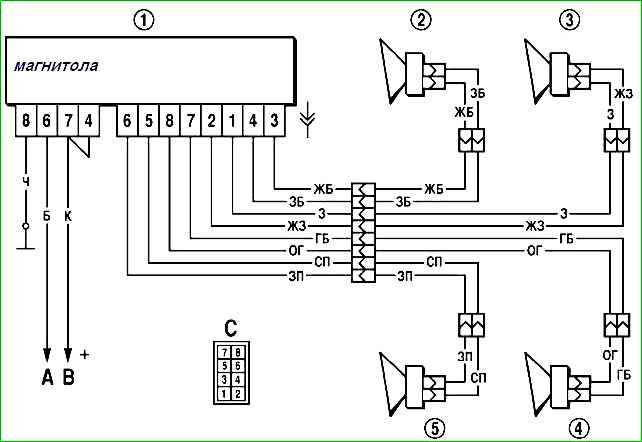
Audio equipment connection diagram
Assemble all the parts in reverse order
")

")
")
")
")
")
")
")