It is convenient to carry out the work in an inspection ditch.
But if necessary, you can remove and install the spring and shock absorber of the rear suspension by placing the car on a flat horizontal platform
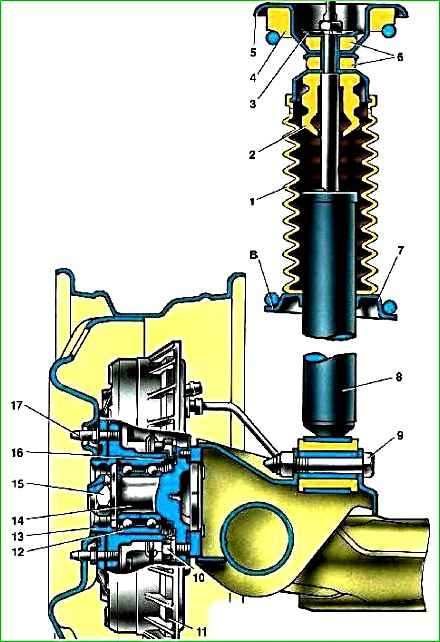
Shock absorber mounting: 1 - protective casing; 2 - compression progress buffer; 3 - support washer; 4 - spring insulating gasket; 5 - upper support cup of the suspension spring; 6 - shock absorber rod mounting pads; 7 - lower spring support cup; 8 - shock absorber; 9 - shock absorber mounting bolt; 10 - wheel hub axle mounting bolt; 11 - brake drum; 12 - hub bearing; 13 - wheel hub; 14 - axis; 15 - nut; 16 - retaining ring; 17 - mounting pin; B - point for shock absorber orientation
To complete the work you will need an assistant, as well as:
- - inspection ditch or overpass;
- - stand;
- - device for disassembling suspension struts.
Withdrawal
We prepare the car for work and hang the rear of the car on stands.
If there is no inspection ditch or overpass, remove the rear wheel of the car from the side of the shock absorber being replaced.

Recline the rear seat back.
Pry it up with a screwdriver and remove the plug

Using a 17mm L-shaped wrench, unscrew the nut of the upper shock absorber mounting, holding the shock absorber rod from turning with a special wrench.

Or use a 6 mm wrench to hold the shock absorber rod from turning, and use a 17 mm spanner to unscrew its nut.
Use a magnet to remove the spring washer from the shock absorber rod

Remove the upper support washer

Remove the upper cushion from the shock absorber rod.

Using a 19mm wrench, unscrew the nut of the bolt of the lower shock absorber mounting to the beam, holding the bolt from turning with a wrench of the same size.

Remove the bolt.
If there is difficulty, knock out the bolt with a soft metal drift

Move the lower end of the shock absorber towards the rear of the car and remove the shock absorber along with the spring

The spring gasket usually sticks to the body, from where it must be removed and ensure that there are no deformations or tears.

Remove the spring gasket
Remove the spring from the shock absorber

Remove the spacer sleeve with the lower cushion from the rod
Remove the cover with the compression stroke buffer.

Remove the compression stroke buffer from the case

Remove the cup from the case
Assemble in reverse order
Installation


For ease of assembly, attach the gasket with tape or tape to the spring, which will facilitate installation, while the end of the spring coil should rest against the protrusion of the gasket

We put the cover on the cup, and the corrugation of the cover should be put on the flange of the cup

We insert the compression stroke buffer into the case so that its corrugated part is at the bottom

The end of the lower coil of the spring should rest against the protrusion of the shock absorber support

To make installation easier, you can put a piece of hose on the end of the rod

The hose will allow you to guide the rod into the hole in the upper support on the body

We install the shock absorber so that the shallower recess (shown by the arrow) for the spring faces the wheel, while the end of the lower coil of the spring on the left side of the car will face the rear of the car, and on the right - to the front.
Fix the lower end of the shock absorber, but do not tighten the nut.
Lowering the car onto the wheel, or lifting this side of the beam with a jack, insert the end of the shock absorber rod into the hole in the body and secure it.
Tighten the bolt of the lower shock absorber mounting in the “car on wheels” position.
Having lowered the car to the ground, rock it vigorously several times.
Tighten with appropriate torques: nut of the lower shock absorber mounting to the beam - 68–84 Nm (6.8–8.4 kgf m), nut of the upper shock absorber mounting – 51–63 Nm (5.1–6.3 kgf m).
After driving 100 km, tighten these threaded connections again to the required torque.
")

")
")
")
")
")
")
")