We remove the upholstery to repair the internal parts of the door, adjust and replace the lock
Removing the sliding door trim GAZ-2705

Use a 12mm socket to unscrew the two bolts securing the door stop.

Remove the stop.

Use a screwdriver to unscrew the two screws securing the socket of the inner handle of the lock

Remove the socket.

Using a thin screwdriver, we remove 15 plastic mushrooms from the upholstery latches.
The caps of the fungi are fragile, so if you can’t remove the fungi from the clamps, we bite off the caps of the clamps with side cutters

Remove the upholstery along with the clamps
We remove the fasteners with bitten off caps using pliers.
Carefully, so as not to tear, remove the thermal and noise insulation layer from the door.

Install the upholstery in reverse order.
Removing the sliding door lock GAZ-2705
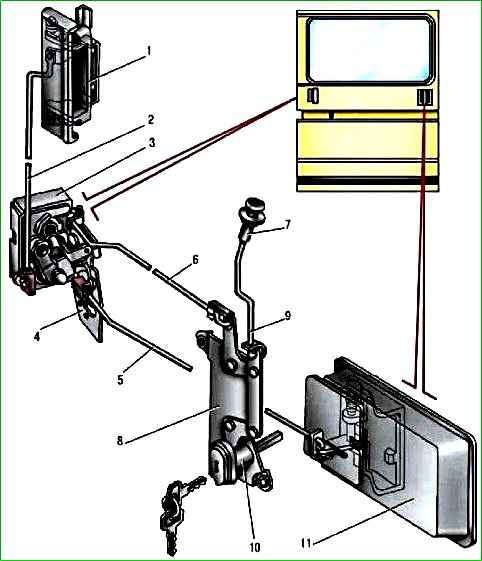
Remove the upholstery.

In the inner cavity of the door, using a “10” key, unscrew the locking switch lock bolt 2-3 turns.

Remove the switch from the outside of the door.

Use a screwdriver to “unsnap” the rod of the inner handle from the lock.

Use a screwdriver to unscrew the two screws securing the handle.

Remove the handle together with the rod.

Use your hand to unscrew the lock button.

Use a screwdriver to unscrew the two screws securing the lock release mechanism with levers.

Move the mechanism to the left towards the opening. Using a screwdriver, “unsnap” the lock of the rod and disconnect it from the lever

Remove the shutdown mechanism with the locking rod.

Use a 8-mm socket to unscrew the four fastening bolts...

Remove the outer lock handle.

Use a screwdriver to unscrew the two screws securing the locking mechanism.

Remove the locking mechanism.

Remove the lock from the inner cavity of the door.

Disconnect the handle mechanism and the switch rod from the lock

Mark the position of the lock on the body.

Unscrew the lock with a 17 key.
Remove the clamp along with the plate and washer.

Using the “8” wrench, unscrew two bolts on the door securing the upper and lower guide pins of the latch

Remove the clamp pins

Using the same key, unscrew two bolts each securing the upper and lower housings of the clamp and remove them from the rack.
Install the lock in the reverse order, lubricating the rubbing joints with engine oil.
After installation, we check the operation of the lock and, if necessary, adjust it by changing the length of the rods and moving the lock within the slot.
We similarly adjust the position of the studs and lock housings of the front part of the door.
")

")
")
")
")
")
")
")