Preparing the car for the job
Disconnect the negative terminal of the battery
Replacing light bulbs in the headlight
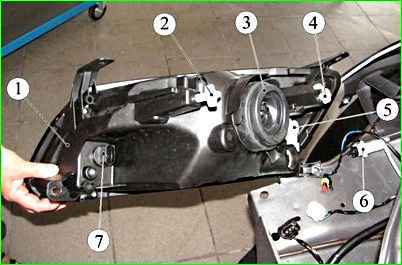
To replace headlight bulbs:

Press the lock shown in the figure with an arrow and remove the cover from the headlight housing

Disconnect the wire block from the lamp terminals and remove the rubber cover

Press the ends of the spring clip and remove them from engagement with the reflector hooks
Remove the clamp from the lamp

Remove the lamp from the headlight housing
Do not touch the bulb of a halogen lamp with your hands.
Remove dirt from the lamp with alcohol.
Install the H4 lamp in reverse order.
Replace the lamp in the left direction indicator by pressing on the socket and turning it counterclockwise.
In the right headlight block, turn it clockwise.

Remove the socket with the lamp from the headlight housing

Press the lamp and turn it all the way in a certain direction and remove the lamp from the socket
We install the new PY21W lamp in the reverse order.
To replace the side light lamp and daytime running light in the left headlight, move the air filter to the side.
You do not need to do this in the right headlight.

Rotate the lamp socket counterclockwise and remove the lamp socket from the headlight housing
Pulling the lamp, remove it from the socket

Install the new W21/5W lamp in reverse order.
Replacing the headlight unit
Disconnect the negative terminal of the battery.
Remove the front bumper (article - Replacing elements of the front part of the Lada Granta body)

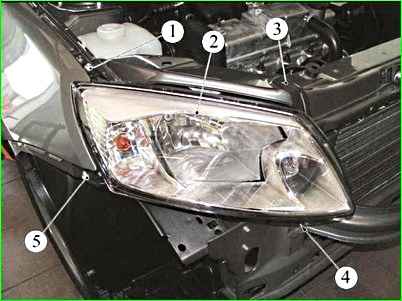
Using a 8mm socket, unscrew the screw for the front headlight mounting

Use a 8-mm socket to unscrew the screw of the lower fastening of the headlight block

Unscrew the screw of the upper fastening of the headlight unit.

We move the headlight forward as the car moves.
Press the lock of the working cylinder of the headlight range control and by turning the cylinder counterclockwise until it stops, remove the working cylinder of the headlight range control from the headlight housing.
Disconnect the wiring block from the headlight lamp, remove the sockets with the turn signal and daytime running lights.

Remove the headlight.
Install the headlight in the reverse order.
Replacing the turn signal and replacing the lamp
We remove the turn signal when replacing the wing and when replacing the light bulb.

Move the side direction indicator towards the front of the car

Remove the repeater from the hole in the front fender

Turn the lamp socket counterclockwise and remove it from the housing

Remove the lamp
Installing the W5W lamp.
Install the repeater in reverse order.
If the gasket under the repeater is damaged, it needs to be replaced.
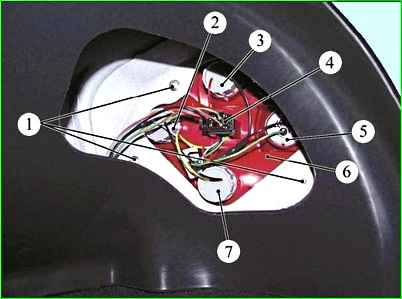
Replacing lamps and removing the rear light
We prepare the car for the job.
Disconnect the negative terminal of the battery.

In the luggage compartment, bend the flap of the trunk upholstery

Rotate the brake signal and side light lamp socket counterclockwise and remove the lamp socket from the housing

Press the lamp, turn it all the way counterclockwise and remove the lamp from the socket
The double-filament lamp for the brake signal and side light has two protrusions located at different levels

When installing a P21/5W lamp, the protrusions on the lamp must fit into the grooves of the socket.
The reverse lamp P21W and the turn signal lamp PY21W are changed in the same way.
The turn signal lamp has two protrusions, located asymmetrically relative to the axis of the lamp.
The type of lamp is indicated on the flashlight body next to the socket of each socket.

In order not to confuse the installation locations of the cartridges in the flashlight body, they are fixed in the protrusions on the cartridges and the cutouts in the flashlight body have different shapes.
Removing the rear light
Preparing the car.
Disconnect the negative terminal of the battery.
For cars 2190
In the luggage compartment, bend the flap of the trunk upholstery

Remove the wire blocks from the holder on the flashlight body

Using a 8mm socket, unscrew the three nuts securing the flashlight

Move the lamp back and remove it from the car
Install the rear light in the reverse order.

The locating pin on the body must fit into the holder on the light body

In order not to confuse the installation locations of sockets with lamps, the cutouts in the flashlight body and the fixing protrusions on the sockets have different shapes.
Also on the body of the flashlight next to the lamp sockets there is an inscription of the corresponding color of the wire suitable for the socket.
Mass wires are black.
To replace the flashlight wiring harness with lamp sockets:

Squeeze the two block clamps and disconnect the wire blocks

Remove the rear light wiring harness
Install in reverse order
For cars 2191
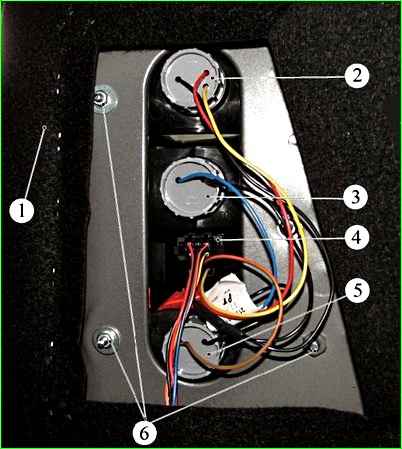
Open the tailgate.

Remove plug 1, drawing, trunk shelf supports at the location where the rear light is attached.
Using an 8 socket with an extension, unscrew the three nuts 1 securing the rear light to the car body.
Disconnect the 4 wire harness block from the flashlight wiring block.
Remove the lantern.
Installing the flashlight

Before installing the rear light, you need to check the presence of clamp 2 on the wing and install it if necessary.
We install the lamp in the reverse order, and it is necessary to ensure:
- - entry of the groove for fastening the rear light into the groove of the retainer on the body;
- - seal lamp for interface with the body;
- - gap between the rear light and the trunk lid (tailgate for car 2191) 4±1.5 mm;
- - the gap between the lamp and the rear fender is 1.5±1 mm;
- - the gap between the lamp and the bumper is 1.5± 1 mm;
- - unevenness of gaps within tolerance;
- - the difference in gaps between the right and left sides is no more than 1 mm.
Tighten the flashlight mounting nuts to a torque of 2-3 Nm (0.2-0.3 kgcm).
Replacing license plate light bulbs
We prepare the car for the job.
Disconnect the negative terminal of the battery.
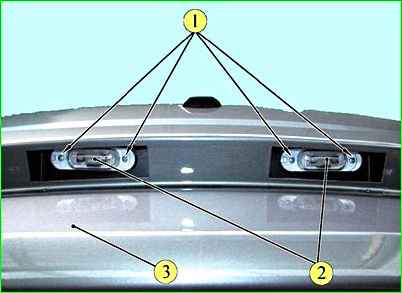
The license plate lights are located in the niche under the license plate of the rear bumper (Fig. 1)

Use a Phillips screwdriver to unscrew the two screws securing the flashlight

Remove the lamp from the hole in the rear bumper

Press the latch, shown in the figure with an arrow, and disconnect the lens and the flashlight body

Remove the lamp from the lantern body
We install the new C5W lamp in the reverse order.
Replacing the dome light bulb and removing the dome light
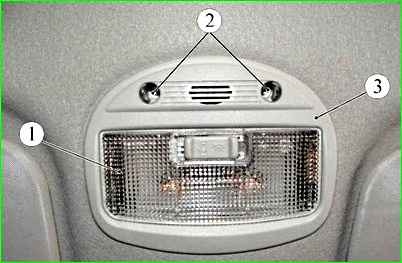
The figure shows 1 interior lamp (part 21700-3714010-00)
The ceiling lamp is usually removed to replace a lamp or to replace the headliner.
Disconnect the negative terminal of the battery.

Pry up the edge of the lampshade with a screwdriver

Remove the lampshade from the hole in the ceiling lining
Disconnect the wire block from connector 2 of the wire block

Remove the lamp from the lampshade
We install the new C10W lamp in the reverse order.
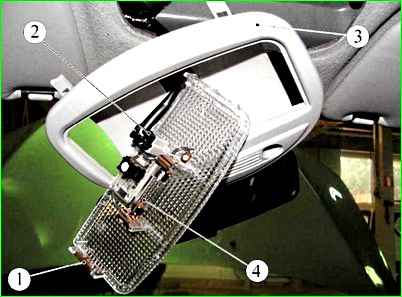
Removing and replacing the lamp in the interior lighting unit
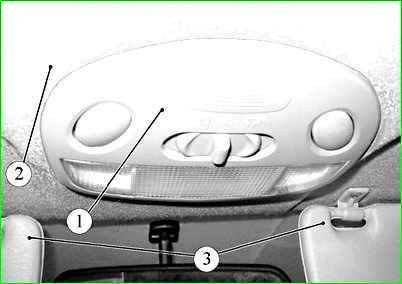
In Figure 6, the interior lighting unit (part - 11180-3714010-00)
Using a flat-head screwdriver, press the latches and remove the cover of block 1, Figure 6, interior lighting
Use a Phillips screwdriver to unscrew the two screws and disconnect the interior lighting unit housing from the body
Disconnect to connect the wiring harness from the interior lighting unit and remove the unit.
To replace the lamps in the interior lighting unit, remove the unit cover.
Press the contacts and remove the general interior lighting lamp.
Turn the individual lighting lamp clockwise or counterclockwise 45˚ and remove the lamp from the unit body.
Install the lamps and unit in reverse order.
Removing the fog light and replacing the bulb
We prepare the car for work. We place the car on the lift. Disconnect the negative terminal of the battery.
Remove the corresponding wheel.
Unscrew the six screws securing the fender liner and bend the front fender liner.
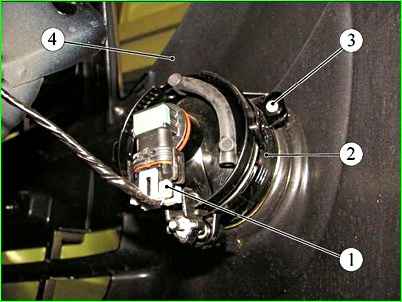
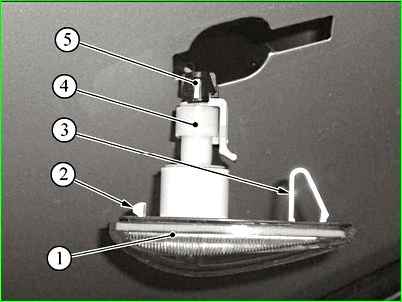
Disconnect block 1, Figure 1, wires from fog lamp 2.
Unscrew the three screws 3 securing the fog light to the front bumper 4 of the car and remove the fog light.
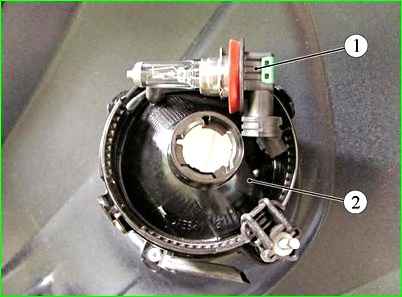
To replace the fog light bulb:
- turn lamp 1, Figure 2, counterclockwise and remove it from the fog lamp housing.
Install the parts in reverse order.