Removing and installing the lighting control unit
We prepare the car for work and disconnect the wire terminal from the negative terminal of the battery
Remove the instrument panel trim (see “Replacing fuses and relays of the Lada Granta”).

Use a Phillips screwdriver to unscrew the screw securing the switch

We remove the switch from the instrument panel by tilting the upper part of the switch towards you

Squeeze the two clamps of the wire block

And disconnect the block from the switch

Install the switch in the reverse order.
Install the lighting control unit in reverse order.
Replacing headlight bulbs
Do not touch the bulbs of halogen lamps with your fingers.
Wear clean cotton gloves without rubber coating.
Greasy fingerprints left on the lamp bulb will shorten its service life several times.
If your fingers accidentally touch the lamp bulb, wipe the bulb with a clean cloth moistened with alcohol.
Replacing high and low beam lamps
We prepare the car for work.
Turn off the outside lighting.
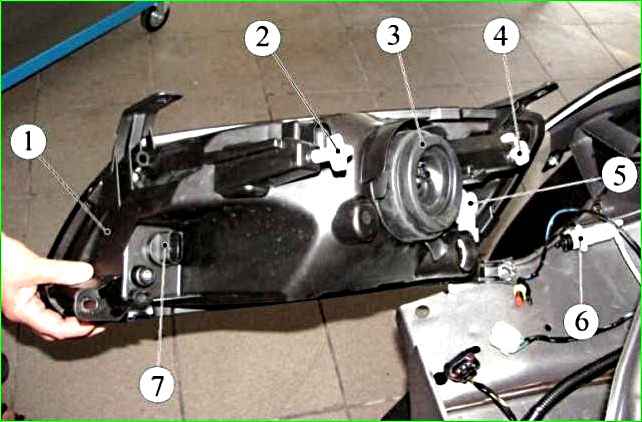
Headlight block: 1 - headlight block; 2 - screw for adjusting the optical element in the horizontal and vertical planes; 3 - cover of the high and low beam lamp socket; 4 - screw for adjusting the optical element in the vertical plane; 5 - lamp socket for side and daytime running lights; 6 - hydraulic headlight corrector (part 21900-3718010-00); 7 - turn signal lamp block
To replace headlight bulbs:

Press the lock shown in the figure with an arrow and remove the cover from the headlight housing

Disconnect the wire block from the lamp terminals and remove the rubber cover

Press the ends of the spring clip and remove them from engagement with the reflector hooks
Remove the clamp from the lamp

Remove the lamp from the headlight housing
Do not touch the bulb of a halogen lamp with your hands.
Remove dirt from the lamp with alcohol.
Install the H4 lamp in reverse order.
Replace the lamp in the left direction indicator by pressing on the socket and turning it counterclockwise.
In the right headlight block, turn it clockwise.

You remove the socket with the lamp from the headlight housing

Press the lamp and turn it all the way in a certain direction and remove the lamp from the socket
We install the new PY21W lamp in the reverse order.
To replace the side light lamp and daytime running light in the left headlight, move the air filter to the side.
You do not need to do this in the right headlight.

Rotate the lamp socket counterclockwise and remove the lamp socket from the headlight housing

Pulling the lamp, remove it from the socket
Install the new W21/5W lamp in reverse order.
Replacing the headlight unit
Disconnect the negative terminal of the battery.
Remove the front bumper (article - Replacing elements of the front part of the Lada Granta body)

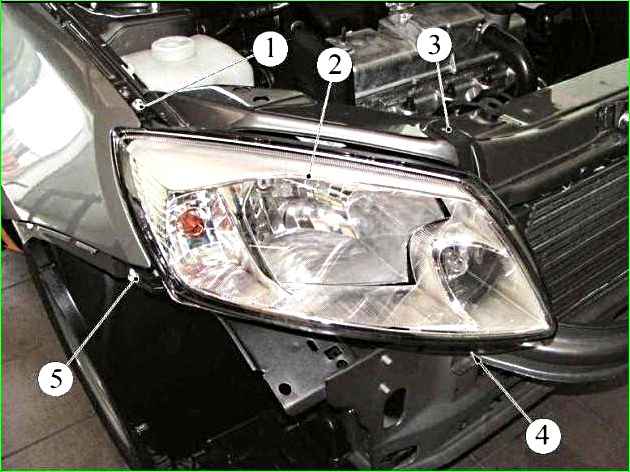
Using a 8mm socket, unscrew the screw for the front headlight mounting

Use a 8-mm socket to unscrew the screw of the lower fastening of the headlight block

Unscrew the screw of the upper fastening of the headlight unit.
We move the headlight forward as the car moves.

Press the lock of the working cylinder of the headlight range control and by turning the cylinder counterclockwise until it stops, remove the working cylinder of the headlight range control from the headlight housing.
Disconnect the wiring block from the headlight lamp, remove the sockets with the turn signal and daytime running lights.

Remove the headlight.
Install the headlight in the reverse order.
Replacing the turn signal and replacing the lamp
We remove the turn signal when replacing the wing and when replacing the light bulb.

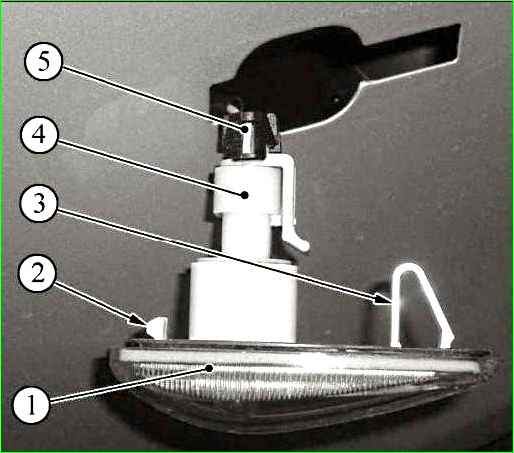
Move the side direction indicator towards the front of the car

Remove the repeater from the hole in the front fender

Turn the lamp socket counterclockwise and remove it from the housing

Remove the lamp
Installing the W5W lamp.
Install the repeater in reverse order.
If the gasket under the repeater is damaged, it needs to be replaced.
Adjusting the headlight light

Screen layout diagram for adjusting the light of the headlights: A - vertical line indicating the location of the center of the low beam lamp of the left headlight; B - vertical line indicating the location of the low beam lamp of the right headlight; C - horizontal line indicating the location of the low/high beam headlight lamps; D - line indicating the height of the rise of the horizontal border of the light beams; O - center line; I is the distance between the low beam lamps of the headlights; h - the distance from the surface of the site on which the car is installed to the center of the low beam headlights
To complete the work you will need an assistant, as well as:
- - a flat horizontal area (preferably near the wall of a house, fence or gate);
- - tape measure 5 m long;
- - a sheet of cardboard (to cover the headlight when adjusting).
It is advisable to make adjustments in the dark.
The vehicle must be in running order (fully fueled and without additional cargo).
Since it is not easy to find a suitable surface as a screen, it is easier to use a plywood board measuring 1x2 m with markings applied to it.
In this case, it is necessary to prepare a stop or stand to install the shield vertically.
We install the car on a flat horizontal platform perpendicular to the surface selected as the screen and at a distance of 5 m from it.
Mark the screen according to the picture.
The necessary measurements can be taken using a tape measure.
Check the tire pressure and, if necessary, adjust it to normal.
Turn the drive knob for the electric headlight adjustment to position 0, which corresponds to the minimum vehicle load.
The assistant sits in the driver's seat.
Having turned on the low beam of the headlights, we cover one of the headlights, for example the right one, with a sheet of cardboard.

By rotating the adjusting screw 1 of the left headlight unit, we bring the horizontal line of the light beam to line “D” on the screen.

Through the hole in the body panel, using a 6 mm hex key, rotating adjusting screw 2, align the bend of the light beam boundary with line “A”
")

")
")
")
")
")
")
")