In this article we will look at removing front door elements to replace or repair door parts.
For work you will need a tool: a set of screwdrivers, pliers, 8, 10 socket, TORX T40
Removing the door trim
We prepare the car for the job. Open the door, lower the door sliding glass.
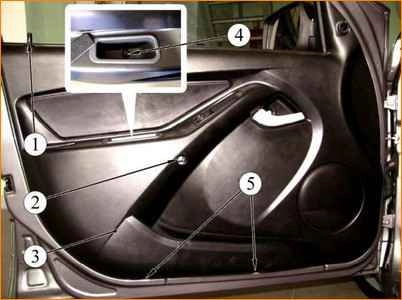
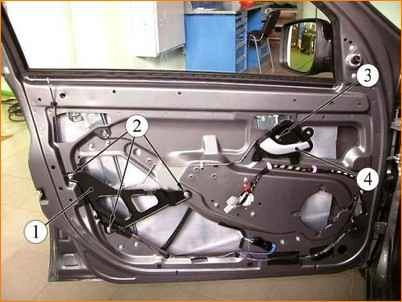
Attaching the left front door trim is shown in Figure 1.
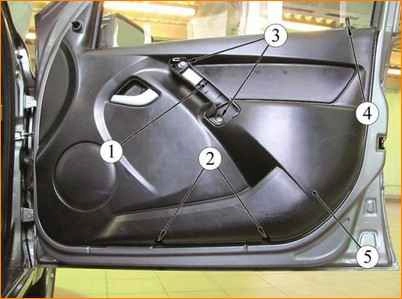
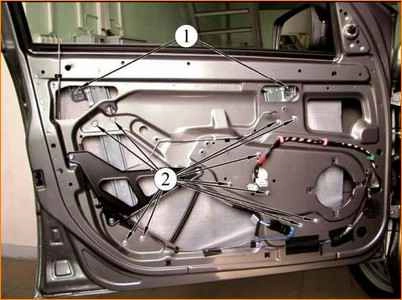
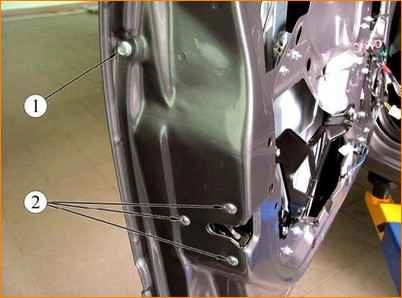
The fastening of the right front door trim is shown in Figure 2.

Unscrew the door lock button

Pry off the plug with a thin flat screwdriver

Remove the plug from the upholstery hole

Use a Phillips screwdriver to unscrew the screw securing the upholstery to the door

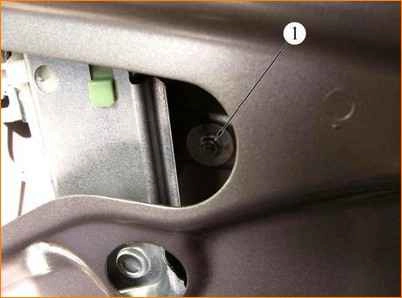
Unscrew the screw in the armrest niche

Use a Phillips screwdriver to unscrew the two screws for the lower fastening of the upholstery

Unscrew the screw under the inside door handle

Insert a screwdriver between the upholstery and the inner door panel and press the lower front corner of the upholstery away from the door, overcoming the resistance of the latches.
This is how we sequentially press the upholstery away from the door.
We remove the mirror control rod from the upholstery at the top of the front part.

Lifting the upholstery up, we release it from the door lock button lever.
We move the upholstery to the length of the power window switch wires.

Press the latches and disconnect the wire blocks from the power window switches.

Remove the front door trim

The picture shows the location of the fastening pistons on the inside of the upholstery

To remove the power window switches, use a screwdriver to press the two latches

Remove the switch block from the hole in the door trim
Install the upholstery in reverse order.
Removing the outside rear view mirror
Remove the mirror to replace or repair it
Remove the front door trim as described above
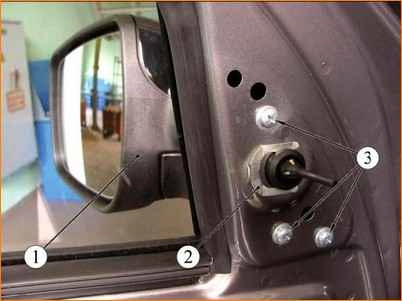
The mirror mounting is shown in the figure

Using pliers, remove the locking bracket of the exterior mirror control handle hinge housing

Use a Phillips screwdriver to unscrew the three screws securing the mirror to the door

Remove the mirror by bringing the cables and ball joint out through the hole in the door panel
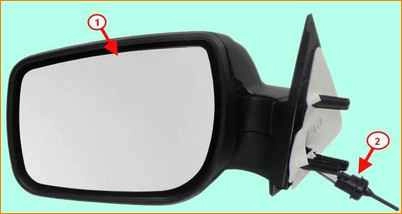
The picture shows the rear view mirror of a Lada Granta car.
Removing the interior front door handle of the Lada Granta
We remove the handle when removing the glass, window regulator and door lock, as well as when completely disassembling the door.
Remove the door trim as described above.

Use a Phillips screwdriver to unscrew the screw securing the base of the handle to the inner panel of the door.

Remove the bent end of the rod from the hole in the lever of the inner handle

Install the handle in reverse order.
When installing, the front tab of the handle base should extend beyond the edge of the hole in the inner door panel.
Removing the front door glass
Install the glass in the upper position.
Remove the door trim, as described above in the first paragraph of the article.
Remove the inner door handle, described in the second paragraph of the article.
Using a 10mm socket, loosen the two bolts 1 of the glass holders (Fig. 1)

Remove the seal from the inner door panel
Lower the window by connecting the wiring harness block to the power window switch.
Turn the glass and remove it from the door.

Install the glass in reverse order.
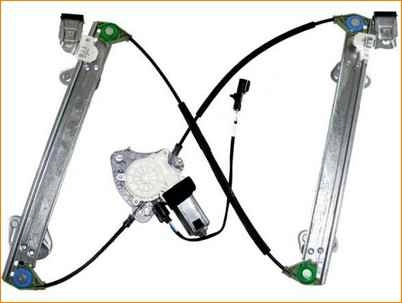
Removing the front door power window
Raise the glass to the top position if the glass is not removed.
Disconnect the negative terminal of the battery
Remove the door trim as described above in step 1.

Fix the glass with tape to the door frame
Loosen the tightening of the bolts 1 of the glass holders

Disconnect the power window motor wire connectors

Using a 8mm socket, unscrew the three bolts securing the door trim mounting bracket

Remove the bracket

Using a 10mm socket, unscrew two nuts 1 of the upper and lower fastenings of the two guide sliders of the window lifter to the inner door panel and three nuts 2 of the gear motor fastenings.

Remove the window lift mechanism from the door through the lower hole in the interior panel
Install the window lift mechanism in reverse order.
Removing the front door outside handle
Installing the glass in the upper position
Remove the door trim and power window mechanism, as described above.
Attaching the door handle in Figure 1
Attaching the lock and door handle in Figure 2

Using a 8mm socket, unscrew the bolt securing the outer handle to the end of the door
Raise the internal protective curtain.

Using a 8mm socket, unscrew the nut securing the outer handle.

Use a screwdriver to press the lever rod away from the latch (shown on the removed door lock)

Oh press the plastic clamp and turn it around its axis

Remove the lock mechanism rod from the hole in the lock lever
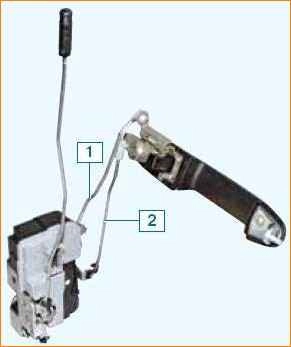
Location of outer handle rods
Move the handle forward, remove the handle with two rods, taking them out through the hole in the outer panel of the door.
Install the handle in reverse order.
Removing the front door lock
Remove the door trim and power window mechanism.
Disconnect the two rods of the outer front door handle, as described above.

Lift the rod of the inner handle and remove it from the plastic holder on the inner panel of the door

Remove the plastic lock lock rod holder from the hole in the inner door panel

Use a Phillips screwdriver to unscrew the three screws securing the lock to the end of the door

We remove the lock assembly with the electric drive through the technological hole

Pull out the red block lock

Disconnect the wiring block from the electric locking drive
Remove the front door lock

In order to remove the rods, press out the plastic clamps of the rods and, turning the fasteners around the axis, remove the rods.
Removing and installing the door limiter
Remove the door trim.
To avoid damaging the door, do not swing it open after removing the stopper.

Use a 13 mm socket wrench to unscrew the bolt securing the limiter to the body pillar.

Use an 8 mm socket wrench to unscrew the two bolts securing the limiter to the door

Remove the limiter of the internal cavity of the door
Install the limiter in the reverse order, and then cover it with any grease
Removing and installing the front door
The door can be removed as an assembly (together with the equipment installed on it).
It is more convenient to disassemble and assemble the door when it is installed on the car.
At the same time, there is less chance of damaging the paintwork.
You will need an assistant to complete the work.
Remove the window regulator.
Remove the glass from the door.
Remove the outer door handle.
Remove the door lock.

Unscrew the nut securing the wiring harness and disconnect the wiring harness block from the door harness block.
Remove the door stop.

While an assistant is holding the door, use a 13 mm spanner to turn out the axis of the lower hinge

Use the same key to unscrew the upper hinge axis and remove the door.
Having covered the working surfaces of the hinges and axles with grease, install and assemble the door in the reverse order.
To ensure reliable contact in the connecting block of the door wiring harness, we treat its terminals with a special agent for cleaning and protecting electrical contacts.
")

")
")
")
")
")
")
")