Place the vehicle on a platform or inspection ditch to gain access from below to the gearbox and clutch
Remove the lower part of the clutch housing.
Remove the clutch release bearing fork.
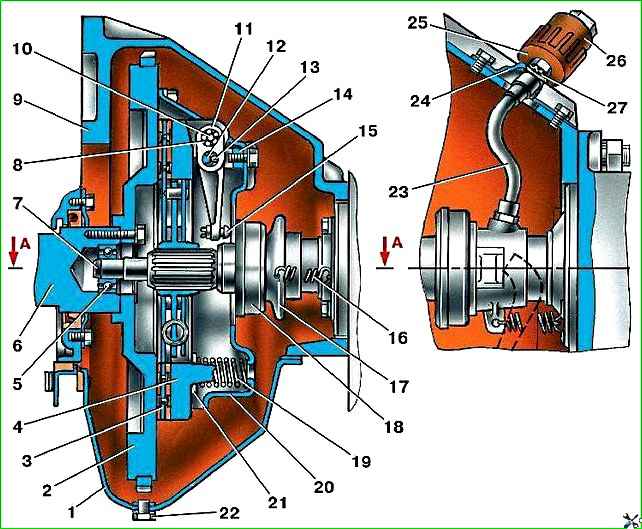
Clutch: 1 - lower part of the clutch housing; 2 - flywheel; 3 - driven disk; 4 - pressure disk; 5 - front bearing; 6 - crankshaft; 7 - input shaft; 8 - needle bearing; 9 - clutch housing; 10 - pull lever finger; 11 - pull lever; 12 - axis of the pull lever; 13 - roller of the pull-out lever; 14 - pull lever fork; 15 - adjusting screw; 16 - clutch release spring; 17 - clutch release clutch; 18 - clutch release bearing; 19 - pressure spring; 20 - clutch casing; 21 - heat-insulating washer; 22 - plug; 23 - bearing lubrication hose; 24 - oiler bracket; 25 - oiler body; 26 - oiler cover; 27 - toothed washer
Remove the oiler cap (on the right side of the clutch housing) and disconnect it from the rubber bearing lubrication hose.
Remove the gearbox from the vehicle (see “Removing the UAZ-3151 gearbox”) along with the clutch release bearing.
Remove the clutch with the clutch release bearing, remove the bearing from the clutch.
Before installing a new bearing, thoroughly rinse the coupling and clean the lubricant supply channels.
Press the bearing with the mark towards the coupling.
Clean the bearing lubrication hose from old grease and fill it with new one.
Wash the journal of the gearbox input shaft bearing cover on which the clutch is placed, and lubricate it with a thin layer of fresh Litol-24 lubricant.
Place the clutch onto the gearbox input shaft bearing cap, attach the release spring and install the gearbox on the vehicle.
When installing, be careful not to damage the bearing lubrication hose.
Perform all other assembly in the reverse order of disassembly.
After assembly, adjust the clearances between the clutch release bearing and the pressure plate levers.

")
")
")
")
")