To check the vacuum booster on a car, press the brake pedal 5-6 times
Then, keeping the pedal pressed, start the engine.
If you feel a downward push on the pedal, then the vacuum booster is working.
Otherwise, check the tightness of the connection of the vacuum hose with the check valve and the fitting of the engine intake pipe, as well as the tightness of the check valve fastening in the amplifier housing.
If necessary, repair leaks.
The serviceability of the valve can be assessed by blowing it (for example, with your mouth) in both directions.
Air should flow in the direction from the amplifier to the receiver, but not in the opposite direction. We replace the faulty valve.
If this does not help, then the vacuum booster is faulty and needs to be replaced.
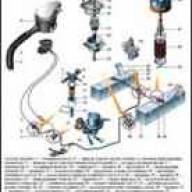
Removing the vacuum booster

Unscrew the two nuts securing the master brake cylinder to the vacuum.
Do not disconnect the brake pipes so that air does not enter the brake hydraulic system.

Carefully bending the brake pipes, remove the main brake cylinder from the studs of the vacuum booster and move it to the side.

Remove the vacuum hose from the amplifier check valve fitting.

In the car interior, under the instrument panel, use a screwdriver to pry up the locking bracket of the pin securing the vacuum booster pusher to the brake pedal.
Remove the locking bracket and take out the pin securing the pusher to the pedal (the brake signal switch has been removed for clarity).

Using a 13mm socket, unscrew the two nuts securing the amplifier to the pedal assembly bracket.

We remove the booster pusher from the hole in the front panel and remove the vacuum booster from the engine compartment.
We replace the check valve of the vacuum booster or its sealing sleeve without dismantling the booster.

Having removed the vacuum hose from the valve fitting, remove the valve from the amplifier hole

Remove the sealing sleeve from the hole of the vacuum booster.
If there is damage on the bushing in the form of tears and cracks or if the bushing loses elasticity, it must be replaced
Assemble and install the vacuum brake booster in reverse order.

")
")
")
")
")