If significant wear, damage and other faults appear on the hubs, wheels, remove them from the car, disassemble them, check the condition of the parts and their suitability for further work
Replace worn and damaged parts with new ones or repair them.
When disassembling the hubs, pay attention to the condition of the bearings, cuffs and their bushings.
Replace bearings with spotty wear, chipping, damaged inner ring flanges or cages.
The wheels must not have cracks, dents or bends.
If you find dents or bends, straighten them and paint the surface.
Radial runout of the landing flanges and axial runout of the inner surface of the wheel rim flanges should not exceed 1.2 mm.
Replace wheels with discs with broken mounting holes.
Removing, disassembling and assembling hubs
Remove the hubs in the following order:
Remove the wheel from the hub.
Unscrew the axle mounting bolts and remove the rear axle axle shaft (hub protective cap, wheel release clutch and front axle drive flange).
Bend the lock washer tab, unscrew the lock nut and remove the lock washer.
Unscrew the bearing adjustment nut and remove the thrust washer.
Remove the hub with the drum, bearings, cuff and cuff thrust washer from the axle.
To replace worn or damaged bearings, disassemble the hub in the following order:

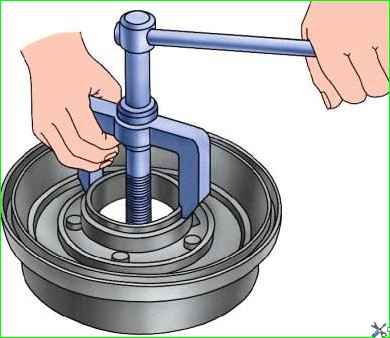
Press out the outer ring of the inner bearing using a tool (Fig. 1).
Simultaneously with the outer ring, a cuff with a thrust washer and the inner ring of this bearing will be pressed out.
Perform this operation carefully so as not to damage the cuff.
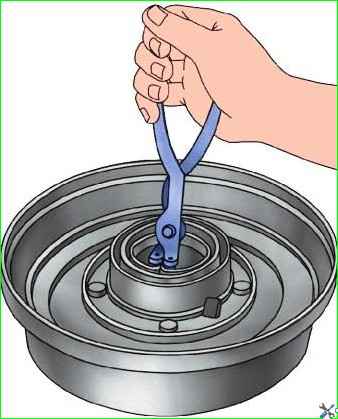
Remove the inner bearing thrust ring using pliers (Fig. 2).
Slide the outer bearing outer race all the way into the hub lug to release the thrust ring.
Remove the outer bearing thrust race using pliers.
Press out the outer ring of the outer bearing using a tool (Fig. 3).
Assemble the hub in reverse order, taking into account the following:
When replacing bearings, also replace the outer rings.
The newly installed outer rings of the wheel bearings must be pressed tightly against their thrust rings, otherwise a gap will appear after adjusting the bearings.
Perform this operation by tightly tightening the bearings with nuts after installing the assembled hubs on the axle (before adjustment).
Be sure to install a thrust washer between the cuff and the inner bearing, otherwise the cuff may be damaged when removing the hub from the axle.
When assembling the hub, the collar must be pressed all the way into the thrust washer.

Press the cuff and outer rings of bearings using an annular mandrel (Fig. 4).
Before installing the hub on the axle, apply grease to the bearings according to the instructions in the lubrication table. 4.
When assembling, remember that a heat-treated thrust washer is installed between the outer bearing and the bearing adjustment nut.
If the washer is missing, the adjusting nut may fail.
If there are even minor cracks on the lock washer's whiskers, replace it, otherwise the washer's whiskers may break and the nuts may self-loose (or self-tighten), which will damage the bearings.
After installing the hub with the drum on the axle, adjust the tightness of the bearings

")
")
")
")
")