Removing and installing the engine on vehicles of the UAZ-31512 family
Before removing the engine from a vehicle mounted on an inspection ditch, do the following:
- 1. Drain the cooling system and oil from the engine crankcase.
- 2. Remove the air filter.
- 3. Disconnect the exhaust muffler pipe from the engine.
- 4. Disconnect the cooling system, heater and oil cooler hoses from the engine.
- 5. Disconnect and remove the cooling system radiator
- 6. Disconnect the air and throttle valve drive rods from the carburetor.
- 7. Disconnect all electrical wires from the engine.
- 8. Disconnect the clutch release slave cylinder and connecting rod from the clutch housing.
- 9. Remove the bolts securing the front engine mounts along with the lower mounts
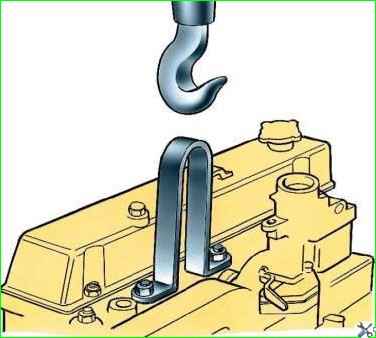
- 10. Install a special bracket on the second and fourth studs of the block head (Fig. 1), counting from the front end of the block.
- 11. Using a lift to lift the engine, disconnect the gearbox from the engine.
- 12. Lift the engine and remove it from the vehicle, leaving the transmission and transfer case remaining on the vehicle frame.
Install the engine on the car in reverse order.
The engine can be removed by lowering it down along with the gearbox and transfer case, and it is necessary to remove the cross member. This method is much more complicated than the first.
Features of engine removal and installation on UAZ wagon-type vehicles
To remove the engine you must:
Remove the seats and hood cover.
Open the hatch in the cab roof, pass the hook with the cable (chain) of the lifting mechanism through it and hook the hook to the bracket.
Lift the engine slightly and disconnect it from the gearbox.
To make engine removal easier, install a board in the doorway that will not bend under the weight of the engine.
Lift the engine into the hood opening using a lifting mechanism and, being careful, remove it through the doorway along the board.
Install the engine in reverse order.

")
")
")
")
")