During repairs, brake pads and wheel cylinders or parts included in them usually need to be replaced, for the removal of which there is no need to remove the entire brake mechanisms
Remove complete brake mechanisms from the vehicle only when they are completely replaced with new ones or when the axles are completely dismantled.
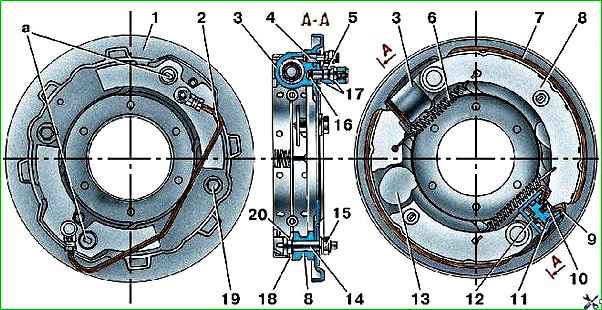
When installing front wheel brakes on a vehicle, pay attention to the correct position of the shield.
The upper cylinder should be tilted forward (from the vertical axis) at an angle of about 30° (on vehicles with final drive axles, the cylinders are positioned horizontally).
When braking, the pads should be pressed out as the brake drum rotates as the vehicle moves forward.
When installing rear wheel brakes on a car, the block with a long lining must be in front.
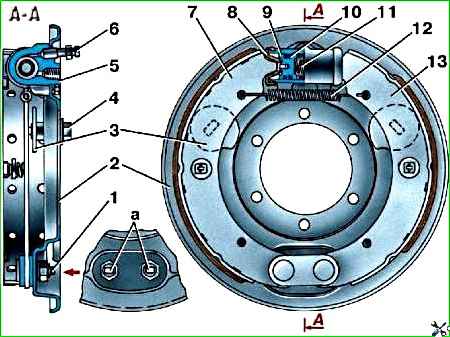
Remove and install brake pads in the following order:
Raise the car with a jack and remove the wheel whose brake pads need to be removed.
Remove the brake drum from the hub. To do this, unscrew the three screws securing the drum to the hub.
If the drum is difficult to remove, then screw the removable bolts into the three special threaded holes in the disk and, tightening them evenly, remove the drum.
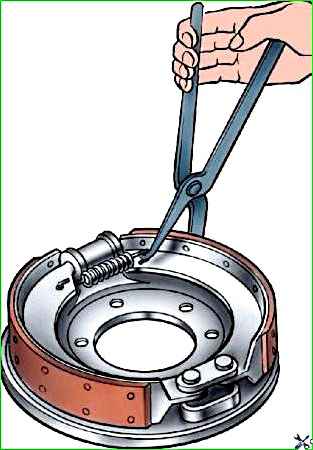
Remove the brake pad tension spring using special pliers (Fig. 3).
Remove the upper release spring cups, springs, lower cups and remove the rods.
Unscrew the support pin nuts, remove the support pins, eccentrics and remove the brake pads.
Installing the pads with new linings and assembling the brake mechanisms is in reverse order.
The brake drums are machined together with the hubs, so after removal, install them on the same hub.
Moving brake drums from one hub to another will increase the runout of the working surfaces of the drum relative to the brake linings.
When installing the drum in place, before tightening the screws, you should firmly press the brake drum to the hub with the wheel nuts and only then tighten the screws.
This is necessary to press the brake drum more tightly to the wheel hub.
Adjust the installation of brake pads in the following order:
Raise the wheel whose brake mechanism needs to be adjusted with a jack.
Slightly unscrew the support pin nuts and set the support pins to the initial position (the marks on the ends of the support pins should be located as shown in Fig. 1 and 2).
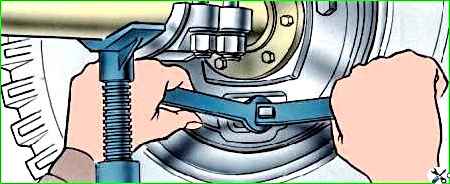
Pressing the pedal with a constant force of 118–147 N (12–15 kgf), turn the support pins so that the ends of the pads on the pin side rest against the brake drum (Fig. 4).
Determine the moment of contact of the pads with the drum by the increase in resistance when turning the support pin.
In this position, tighten the support pin nuts, being careful not to turn the pins.
Turn the adjusting eccentrics until the pads touch the brake drum until the wheel locks it freezes.
After stopping pressing the pedal, turn the adjusting eccentrics in the opposite direction so that the wheels rotate freely, without the drum hitting the pads.
When correctly installing new pads with unworn brake drums, the “a” marks on the support pins should be located as shown in Fig. 1 and 2 or with deviations from this position in one direction or another up to 50°.
When installing new pads, when the friction linings have not yet been run in to the surface of the drums, the brake drums may become slightly warm after the indicated adjustment.
After several braking sessions the pads will break in and the heating will stop.
If the brake drums are very hot, move the pads slightly away from the brake drum using the adjusting eccentrics.
Remove and disassemble the wheel brake cylinders in the following order:
- 1. Disconnect the pipeline from the cylinder and remove the cylinder.
- 2. Remove the cylinder protective caps, take out the pistons with sealing rings and springs.
Assemble and install the wheel brake cylinders in the reverse order.

")
")
")
")
")