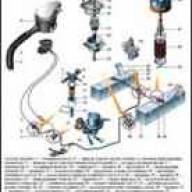
Engines can be equipped with a timing gear drive with an automatic timing belt tensioner or with a tension roller.
In the latter case, it is necessary to regularly (when performing maintenance, every 15,000 km) check the condition and tension of the timing belt, and change it every 75,000 km.
With an automatic tensioner, there is no need to check and adjust the timing belt tension. In addition, in such a drive the service life of the belt itself is significantly increased.
This does not exclude failure of the tension mechanism or oil leakage through the shaft seals.
Oil getting on the timing belt leads to a significant reduction in its service life.
If the teeth on the belt break, the valve timing will be disrupted and possibly cause serious engine damage.
A broken belt will inevitably cause the engine to stop.
Taking all this into account, on engines with an automatic tensioning mechanism, it is advisable to check the condition of the timing belt, and if defects are found, replace it.
Checking the timing belt with tension roller
The timing belt should be checked during vehicle maintenance - every 15,000 km.
To complete the work, you will need a wrench to tension the timing belt.
We prepare the car for work.

Using a 10 mm wrench, unscrew the three bolts securing the front timing belt cover.
Lift the cover vertically up and then remove it from the engine.
Rotating the crankshaft, visually check the condition of the belt.
The crankshaft can be rotated with a 17 mm spanner by the bolt securing its pulley or with a large slotted screwdriver by the flywheel teeth.
To do this, remove the rubber plug from the hole in the clutch housing.
The belt must be clean, without dirt or oil on its surface.
A belt with tears, cracks, delaminations, cut or worn teeth, or abrasions down to the cord must be replaced.

Using two fingers, we try to rotate the belt 90° in the area between the crankshaft and camshaft pulleys, applying a force of 15-20 Nm (1.5-2.0 kgf.m).
If the applied force is not enough to turn the belt to the required angle, the belt is overtightened; If the belt can be turned to a greater angle, then the belt is not tensioned enough.
Excessive belt tension, oil and dirt on it will shorten the life of the belt, and also accelerate wear on the tension roller and coolant pump bearing.
Belt tension should be adjusted on a cold engine.

Use a 17 mm wrench to loosen the tension roller nut.

By turning the roller with a special wrench, we achieve the required belt tension and, holding the roller in this position, tighten the nut of its fastening
Check the belt tension (see above) and repeat the adjustment if necessary.
Finally tighten the roller fastening nut to a torque of 33.23-41.16 Nm (3.4-4.2 kgf-m).
Reinstall the front belt cover and tighten its fastening bolts.
Replacing the timing belt with tension roller
Remove the front timing belt cover.
Remove the front right wheel and engine mudguard.
Remove the generator belt (see the article - “Replacing the Lada Granta generator belt”).

Using a 17 mm socket wrench with an extension, use the pulley mounting bolt to turn the crankshaft until the mark on the camshaft pulley aligns with the protrusion of the rear timing belt cover.

Remove the rubber plug installed in the upper part of the clutch housing.

Use a 17 mm socket wrench to unscrew the crankshaft pulley mounting bolt;

- in this case, an assistant uses a screwdriver inserted through the opened window between the teeth of the flywheel ring to keep the shaft from turning.

Remove the pulley.

Unscrew the nut securing the tension roller and loosen the tension of the toothed belt as much as possible.

Remove the timing belt from the pulleys.
Rotating the tension roller, we check its condition. A roller that has play and makes a lot of noise when rotating is replaced.
Installation
Check the alignment of the marks on the crankshaft toothed pulley and the boss on the oil pump housing.

We also make sure that the mark on the camshaft pulley matches the protrusion of the rear timing belt cover.
- Install a new belt in the following sequence: without allowing the toothed pulleys of the crankshaft and camshaft to rotate relative to the marks, put the belt on the crankshaft pulley;
- - having slightly tensioned the right branch of the belt, we put it on the camshaft pulley; we pass the belt from the inside of the tension roller and put it on the coolant pump pulley.
- Adjust the belt tension.
- We tighten the bolt securing the crankshaft pulley and, turning the engine crankshaft two turns, make sure that the marks on the pulleys and the engine match. If necessary, reinstall the belt.
- Install the crankshaft pulley and tighten its fastening bolt to a torque of 97.9-108.8 Nm (9.9-11.1 kgcm).
- Reinstall the front timing belt cover, alternator belt and parts removed during disassembly.
Checking the timing belt with automatic tensioner
We prepare the car for work.

Use a 5 mm hex key to unscrew the four bolts securing the front upper timing belt cover.

Remove the cover from the engine

Rotating the crankshaft (at the pulley bolt or and behind the flywheel ring gear, through the inspection hole in the clutch housing), we check the condition of the belt by external inspection.
Make sure that the marks on the tensioner match.
The belt must be clean - without dirt or oil on its surface.
It is necessary to replace a belt with tears, cracks, delaminations, cut or worn teeth, abrasions to the cord, or oily ones. Oil leaks should be eliminated as soon as possible.
After inspection, install the cover.
Replacing a timing belt with an automatic tensioner
Withdrawal
We prepare the car for work.
Remove the upper front timing belt cover.
If you are removing the timing belt not to replace it, use a marker to mark the direction of its rotation.
When assembling, it should be installed in accordance with the mark.
Remove the front right wheel and place the car on a reliable stand.
Remove the right side of the engine mudguard.
Remove the generator drive belt.

Using a 17 mm socket wrench, turn the crankshaft until the marks on the camshaft pulley align with the mark on the rear timing belt cover.
This position will correspond to the position of the crankshaft at TDC of the compression stroke of the first cylinder.
It is not allowed to rotate the crankshaft by the camshaft pulley bolt.
When performing the following operation, the crankshaft can be held with a slotted screwdriver by the flywheel ring gear by removing the rubber plug installed in the upper part of the clutch housing.
Also, the crankshaft pulley bolt can be unscrewed if an assistant shifts into high gear and presses the brake pedal.
But the crankshaft may turn slightly. Therefore, it is necessary to re-check that all marks match.

Using a 17 mm socket wrench with an extension, unscrew the crankshaft pulley mounting bolt and remove the pulley.

Use a 5 mm hex key to unscrew the three bolts securing the lower front timing belt cover.

And remove the cover

Remove the limit washer from the crankshaft.

Using a 15 mm wrench, turning the automatic tensioner mounting bolt half a turn counterclockwise, loosen the tension on the timing belt.
Remove the timing belt. After removing the belt, check the condition of the tension roller
Installation
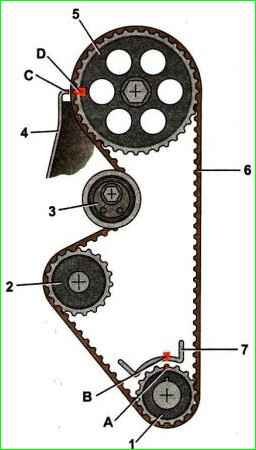
We put on a new belt, laying its branches in accordance with the drawing, and making sure that the mark on the crankshaft timing pulley is located opposite the boss made on the oil pump housing.

We put the belt on the camshaft pulley so that the front branch is tensioned.
Without letting the belt loosen, we put it on the pump pulley and on the tensioner pulley.

Using a puller for the locking elbows, turn the tensioner in the direction of the arrows until the marks on it align with a 15 mm wrench and tighten the bolt securing it to a torque of 33.2-41.2 Nm (3.4-4.2 kgf.m).
If the camshaft has turned, then loosen the belt and reinstall it by turning the incorrectly installed camshaft (permissible mismatch of marks within one tooth of the camshaft pulley).

By turning the crankshaft two turns (by the flywheel crown or by screwing the pulley mounting bolt into the shaft), we verify by matching the marks that the relative position of the shafts is not disturbed.
If necessary, align the marks and repeat the installation of the belt.
After aligning all the marks, we install the parts removed from the car in place.

")
")
")
")
")