Removal and installation of the cylinder head can be found in the article - “Replacing the cylinder head gasket.”
We also look at articles on the topic:
- - “Lapping in cylinder head valves”;
- - “Replacing camshafts”;
- - “Replacing camshaft seals”;
- - “Replacing the collector gasket.”
- - "Replacing the cylinder head cover gasket"
You will need: a device for compressing valve springs, a device for pressing out and a mandrel for pressing in valve stem seals, socket wrenches “8”, “10”, “13”, wrenches “19”, “21”, 10mm hexagon, screwdriver, tweezers.
Remove the cylinder head from the engine

Install the cylinder head with the camshafts up, placing wooden spacers under it to avoid damaging the valves.

Using a 13mm socket, unscrew the three nuts securing the left support of the power unit

Remove the support

Use a 10 mm wrench to unscrew the two bolts securing the fuel pipe bracket

Remove the bracket

Use a 10 mm wrench to unscrew the two bolts securing the phase sensor

Remove the phase sensor

Use a 21 wrench to unscrew the warning light sensor for emergency oil pressure drop from the camshaft bearing housing

Unscrew the coolant temperature sensor from the thermostat with a 19mm wrench

Use a 21 wrench to unscrew the coolant temperature gauge sensor from the rear end of the cylinder head

Use a 13mm wrench to unscrew the two thermostat mounting nuts

Remove the thermostat

Remove the sealing gasket installed underneath

Turn out the spark plugs with a spark plug wrench to avoid accidentally damaging them

Use a socket head to unscrew twenty bolts securing the camshaft bearing housing.

Remove the housing

Remove the camshafts from the cylinder head supports and remove the oil seals from their front ends

Remove the plugs from the rear end of the cylinder head

Remove the valve lifters from the holes in the cylinder head

Clean the combustion chambers from carbon deposits.
Inspect the block head.
If there are cracks or signs of burnout in the combustion chambers, replace the head.
Remove burrs and nicks on the plane of the block head.
Check the flatness of the surface adjacent to the cylinder block.

To do this, place the ruler with its edge on the surface of the head, first along the middle, and then along the diagonals, and use a feeler gauge to measure the gap between the surface of the head and the ruler.
If the gap is greater than 0.1 mm, you can grind the mating surface.

Similarly, check the flatness of the mating surfaces of the cylinder head under the intake manifold

Check the flatness of the collector.
The non-flatness of these surfaces should not exceed 0.1 mm

To check the tightness of the block head, plug the hole in the head for the thermostat socket.
This can be done, for example, by installing a blank spacer made of thick cardboard under the socket and tightening the nuts securing it.
Reinstall the coolant temperature gauge sensor if it was removed.

Pour kerosene into the water jacket channels.
If the kerosene level decreases after holding for 15 - 20 minutes, it means there are cracks in the head and it needs to be replaced.
After checking, do not forget to remove the cardboard gasket and remove the plugs.
Check the condition of the supporting surfaces under the distributor journals y shafts on the block head and bearing housing.

If at least one of them has signs of wear, scoring or deep marks, replace the head and bearing housing.

Rinse the oil channels.
To do this, plug the vertical oil channel on the side of the combustion chamber (the channel is located between the 3rd and 4th cylinders).

Pour gasoline into the oil channel of the cylinder head.

Pour gasoline into the channel of the camshaft bearing housing and wait 15 - 20 minutes.
Pour out the gasoline, remove the plug and finally rinse the channels with gasoline using a blower.

To check the tightness of the valves, screw in the spark plugs and pour kerosene into the combustion chambers.
If kerosene does not leak from the combustion chambers into the channels within 3 minutes, the valves are sealed.
Otherwise, lap the valves or replace the valves.

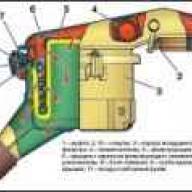
To replace or grind valves, remove the following parts from the cylinder head: 1 – valve; 2 – spring; 3 – plate, 4 – crackers.
Place a suitable stop under the valve to be removed.

Install the valve spring compressor by screwing the camshaft bearing cap bolt into one of the holes in the head of the block and hooking the tool onto this bolt.
Compress the valve spring with the tool.

Remove the two crackers from the upper spring plate using tweezers or a magnetized screwdriver.
Then remove the device.
If the force of moving the lever of the device increases significantly, and the crackers do not come out of the valve groove, apply a light blow with a hammer on the spring plate to release the crackers.

Remove the spring plate

Remove the spring.

Push and remove the valve from the cylinder head.

Compress the valve stem seal with a tool or pliers

Clean the carbon deposits from the valve with a suitable tool.
Then carefully inspect the valve.
Replace valves with the following defects: deep marks and scratches on the working chamfer 1, cracks, deformation of the rod 3, warping of the disc 2, burn marks.
Shallow marks and scratches on the working chamfer can be removed by grinding the valves.
If damage to the working chamfer of the valves cannot be removed by lapping, you can grind the chamfer on a special machine.

Check the condition of the valve seats. The working chamfers of the seats should not show signs of wear, holes, corrosion, etc.
Valve seats can be replaced.
More significant defects in valve seats can be eliminated by grinding.
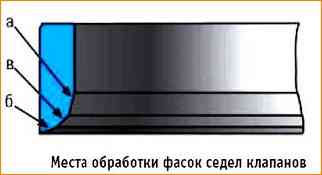
You can manually sand the seats using a set of cutters.
First, chamfer “a” is processed at an angle of 15˚, then chamfer “b” at an angle of 20˚ and chamfer “c” at an angle of 45˚.
After grinding, the valves must be ground in

Check the condition of the valve springs. Replace bent, broken or cracked springs.
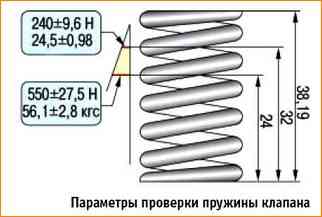
To check the elasticity of the outer spring, measure its height when free and then under two different loads.
If the spring does not meet the required parameters, replace it.

Inspect the valve lifters.
If there are scratches or other defects, replace the hydraulic pushers.
Measure the outer diameters of the pushers, replace worn pushers.
On the working surfaces 2 there should be no burrs, nicks, scratches, signs of stepped or uneven wear, or metal rubbing.
Hydraulic pushers with such defects must be replaced.
On surfaces 2, concentric marks of running in with the camshaft cams are allowed.
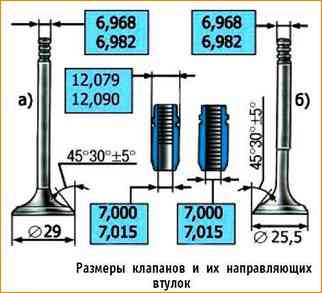
Check the clearances between the guide bushings and valves.
The clearance is calculated as the difference between the diameter of the hole in the bushing and the diameter of the valve stem.
Gaps between valve and guide sleeve, mm:
- - nominal for intake and exhaust valves – 0.018-0.047
- - maximum permissible for intake and exhaust valves – 0.3
If the gap has not reached the maximum permissible value, you can try to eliminate it by replacing the valve.
If this cannot be done or the gap exceeds the maximum permissible, replace the guide sleeve.
To do this, press out the defective bushing from the side of the combustion chamber using a mandrel, having previously measured the height of the protrusion of the upper part of the bushing above the surface of the block head.
Cool the new bushing (for example, using carbon dioxide, lubricate it with oil, insert it into a special mandrel and press it into place on the camshaft side so that the protrusion height of the upper part of the bushing corresponds to the measured value.
Ream the hole in the bushing using a reamer to 7.0 - 7.015 mm for the intake and exhaust valves.

If you are installing an old valve, remove the burrs from the grooves under the crackers. After this it is necessary Now grind the valve to the seat.
Install the valves into the cylinder head in accordance with the previously made markings, after lubricating the rods with engine oil.
Install the valve stem seals.
Install the camshafts and camshaft bearing housing.
Install all parts and assemblies removed during disassembly onto the block head.

")
")
")
")
")