Some drivers, trying to wear out the parking brake cable less, try to use it less often
Such “savings” lead to a bad result: the cable, rarely moving in the shell, gradually loses mobility and ultimately jams and breaks.
Use the parking brake whenever necessary.
Replacing the parking brake lever pawl spring
If the parking brake lever does not lock into the selected position, first check the pawl spring. If the spring is OK, replace the lever.

Unscrew the button from the lever

Remove the pawl spring.
Replace the defective spring
Repairing the parking brake lever
We install the car on a lift or inspection ditch
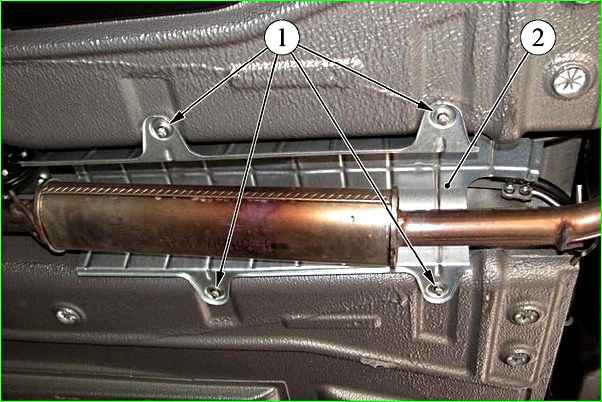
Unscrew the four nuts 1 from the bottom of the car, securing the body floor protection, remove the spring and flat washers.
We disengage screen 2 from the mounting studs and move it forward in the direction of vehicle movement, thereby freeing up the location of the elements of the manual brake system.

Using a 13mm wrench from the bottom of the car, unscrew the locknut and the parking brake adjusting nut and remove the equalizer 1 from the rod 2.

Remove the protective cover from the hole in the floor and remove it from the rod.
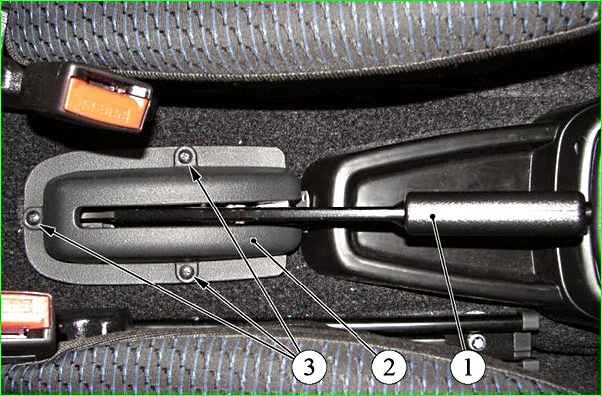
Use a Phillips screwdriver to unscrew the three screws 3 securing the cover of the protective lever of the manual brake

Remove the parking brake lever trim

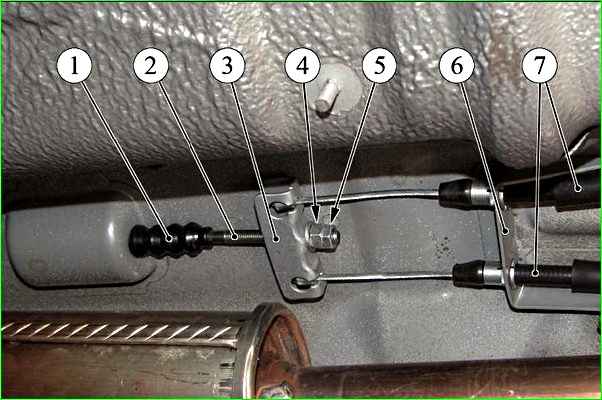
Disconnect the wire block from the parking brake warning switch

Use a Phillips screwdriver to unscrew the self-tapping screw

Remove the push-button switch

Using a 13mm socket, unscrew the two bolts securing the parking brake lever bracket to the floor tunnel

Remove the bracket for securing the parking brake warning switch

Remove the parking brake lever with bracket and rod assembly, pulling the rod through the rubber sealing boot

Use a screwdriver to pry up the fixing bracket of the thrust axis and remove it

Remove the axle and rod from the parking brake lever
Install the lever in reverse order.
Adjusting the parking brake.
Replacing parking brake cables
Replacement of cables must be done simultaneously on the left and right.
We install the car on a lift or inspection ditch
Unscrew the locknut and the adjusting nut from the parking brake lever

Remove the cable equalizer from the parking brake lever

Remove the cable ends from the equalizer and remove it

Remove the end of the left cable sheath from the bracket
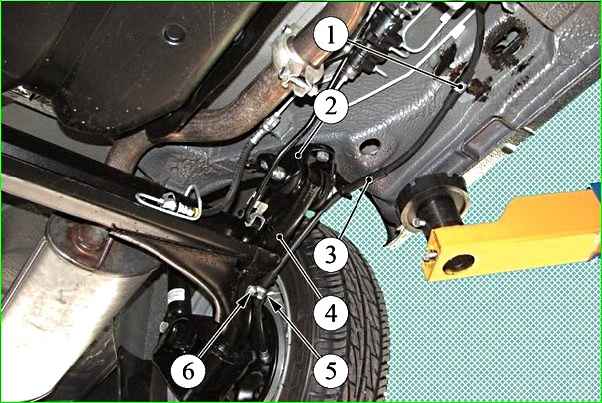
Disconnect the rear end of the left cable from the parking brake lever (described in the article - “How to repair the rear wheel brakes of a Lada Granta”)

We remove the tip of the cable and the brake shield

Using a 10mm wrench, unscrew the nut and remove the bracket securing the cable sheath to the rear suspension beam

Remove the cable sheath from the holder on the rear suspension beam mounting bracket

Use a screwdriver to bend the cable mounting bracket on the body and remove the cable from the bracket

Using a 10mm high socket, unscrew the four nuts securing the heat shield tank

Removing the screen

Remove the cable from the holder on the body

We remove the left parking brake cable from behind the protective screen of the fuel lines
Installing parking brake cables
Mount one of the cables in the reverse order and insert its front end into the cable equalizer

We bring the parking brake lever rod into the hole in the equalizer and tighten the adjusting nut several turns
To install another cable, you can make a device from a metal tube about 30 cm long and a hole with a diameter of 15-16 mm.
Drill a hole at one end of the tube and cut a thread in it for a screw (M4-M6).

Device for installing cable
Attach the cable to the holders on the body and the rear suspension beam mounting bracket

Put the tube onto the rear end of the cable and secure the cable sheath to the end with a screw

Use a rod (you can use a wrench) to press on the tip of the cable, compressing its spring
In this case, the front end of the cable will come out of the sheath and can be inserted into the equalizer.
We carry out further installation of the cable in the reverse order
After replacing the cables, we adjust the parking brake.
The parking brake should hold the car on a slope of 23%
The full stroke of the parking brake lever should be from 2 to 4 teeth (clicks) of the ratchet

")
")
")
")
")